A hose clamp is used to clamp a hose to a fitting, preventing the fluid in the hose from from leaking at the connection. There are a variety of attachments available, from car engines to bathroom fixtures. In spite of this, hose clamps are used across a wide range of industries in order to secure the transportation of products, liquids, gases, and chemicals. Hose clamps fall under four broad categories: screw/band, spring, wire, and ear. Different types of clamps are used for different kinds of hoses depending on their end attachments. There are many questions surrounding the use of hose clamps, one of the most frequently asked question is how to tighten a hose clamp?
In this guide, we will explain the different types of hose clamps, their uses, and how to care for them. A discussion of the different industries in which hose clamps are utilized will also be covered, providing you with answers to all your questions about hose clamps!
Furthermore, we will focus on, especially the guide on how to tighten a hose clamp. So let’s get started.
How Do Hose Clamps Work?
- The first step in attaching a hose clamp is to attach it to the edge of the hose.
- Next, the hose edge is placed around an object.
- As the clamp is tightened, the hose is secured in place and nothing from inside can escape.
In general, screw/band hose clamps are not commonly used for ultra high pressure scenarios, but rather in lower pressure environments as well as for quick fixes, especially in the home. The automotive, agricultural, and marine industries, among others, use them. Learn more about hose clamp here.
How To Use A Hose Clamp?
It is possible to use a hose clamp to keep your hose from kinking or to keep it organized while in storage if your hose tends to kink. Hose clamps fit most hose sizes, and they clamp the hose to keep it in place by compressing it. You must first determine the size of clamp you need before using a hose clamp. Make sure the screw of the clamp faces upward when you place it around the hose. Tighten the screw until the hose is securely attached. Overtightening the screw can damage the hose, so be careful not to do so.
In order to prevent fluid from leaking, hose clamps secure a hose to a fitting. In the automotive and plumbing industries, they are commonly used. T-bolts, worm-drives, and plastic hose clamps are the three main types of hose clamps. Whenever there is a high-pressure hose or a high-vibration application, T-bolts can be used as clamps. Screwdrivers and wire cutters are also acceptable tools for installing hose clamps, but TorqueWover is the best choice. Manufacturers describe torque standards for clamps in inches. Heavy-duty applications are best served by steel. The use of plastics is a cost-effective alternative to metals in a variety of applications, but their specific uses necessitate their use.
What are the Common Types of Hose Clamps?
Clamps are often used to attach fluid-filled hoses to machinery. Coolant hoses connected to the radiator and motor of a typical car or truck using clamps. The clamps prevent the coolant hoses from leaking as well as holding them in place. If the clamp is tight enough, the coolant won’t leak even as it heats up inside the hose. There are three types of hose clamps that are most commonly used.
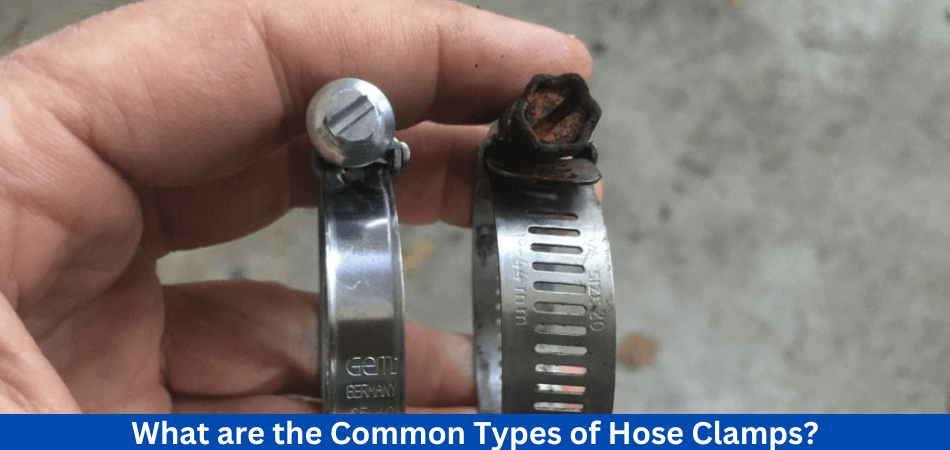
1. Screw Clamps
Screw clamps are clamps that have an integrated screw, also called worm gear clamps. This is a strip of metal with a thread pattern, usually made of stainless steel or galvanized steel. The thread pattern on screw clamps connected to a screw that used to tighten or loosen them. The screw clamps will tighten when the screw turned right, whereas the screw clamps will loosen when the screw is turned left.
2. Constant-Tension Clamps
Constant tension clamps are another type of hose clamp. Hoses are continuously tensioned with constant-tension clamps. There are no screws on them. The constant-tension clamp made from a coil of spring steel. The ring-shaped clamps resemble screw clamps, with both types resembling rings. A constant-tension clamp, however, does not have any screws.
The installation of constant-tension clamps requires a different method than that of screws. The ends can pressed together to install them. Tabs fixed at the end of constant-tension clamps. By pressing together, these tabs will force the constant-tension clamps to open. The constant-tension clamp can placed around a hose and then released so that the hose clamped.
3. Wire Clamps
Wire clamps are also available. As their name implies, wire clamps are made up of a single wire. A U-shaped wire formed by pressing and manipulating it. There is a captive nut and a captive screw on the opening of this U-shaped design. By removing the screw, you can place a wire clamp over a hose. With a screwdriver, tighten the screw after adding the screw. The captive nut can used to secure the wire clamp once it has ben tightened sufficiently.
A wire clamp is less common than a screw clamp or a constant-tension clamp. Nevertheless, some hoses still use them. Easy to tighten and loosen, they have a simple design. Wire clamps have the disadvantage of not lasting as long as other types of clamps.
Which Hose Clamps Should You Choose?
Different automotive systems require different types of hose clamps, depending on the size and type of hose, the pressure and temperature requirements, and where the hose located. In general, the following hose clamp types recommended for different automotive systems:
1. Cooling System
An ear clamp or spring clamp is commonly used in the cooling system. An ear clamp provides a tamper-proof seal while worm gear clamps are easy to install and adjust.
2. Fuel System
Fuel system hose clamps are commonly used because they provide a secure grip and are easy to install and adjust.
3. Vacuum System
Worm gear hoses and spring clamps provide constant pressure on the hose and are easy to install and remove in vacuum systems.
4. Exhaust System
These clamps provide strong, secure connections and can withstand high temperatures in the exhaust system.
5. Air Intake System
The air intake system usually uses worm gear hose clamps or T-bolt clamps for their secure connection and heat resistance.
What are the Advantages of Automotive Hose Clamps?
There are many reasons why automotive hose clamps are widely used in the automotive industry, including:
- Secure Hose Connections: Using hose clamps in automotive systems ensures that fluids flow properly and prevents leaks.
- Easy to Install and Remove: Changing hoses or performing maintenance on automotive systems is easy with hose clamps.
- Adjustable: Worm gear clamps, for example, are adjustable, allowing the clamp to tightened around the hose with ease and precision.
- Durable: The metal used in automotive hose clamps makes them solid and durable, able to withstand high temperatures and pressures.
- Versatile: Hose clamps come in a variety of sizes and types, making them suitable for a wide variety of automotive applications.
- Cost-effective: In automotive systems, hose clamps are a cost-effective way to secure hoses because they are relatively inexpensive.
A hose clamp provides a secure and reliable connection between hoses and ensures that fluids flow properly in an automotive system. They are ideal for use in the automotive industry because of their ease of use, adaptability, durability, versatility, and low cost.
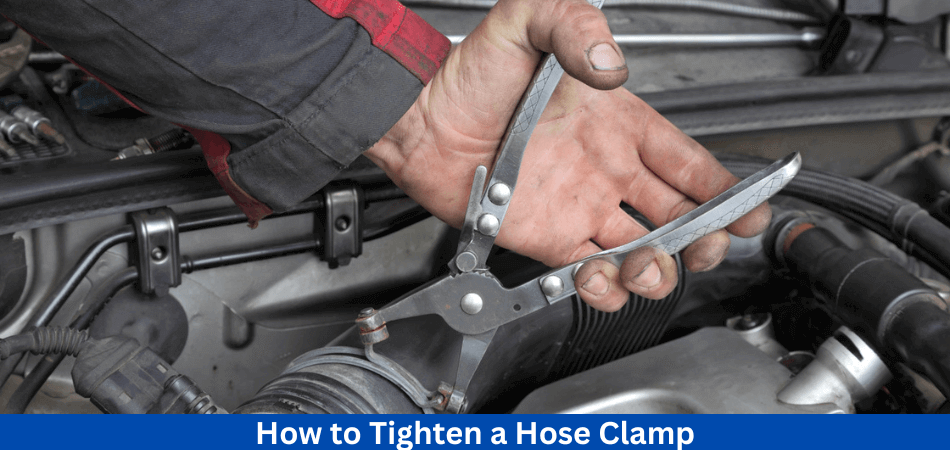
How to Tighten a Hose Clamp?
A hose clamp tightens a hose over a fitting usually made of stainless steel. It is commonly used for car engines, bathrooms, and other plumbing applications, providing a secure and tight connection to prevent leaks. But, how to tighten a hose clamp?
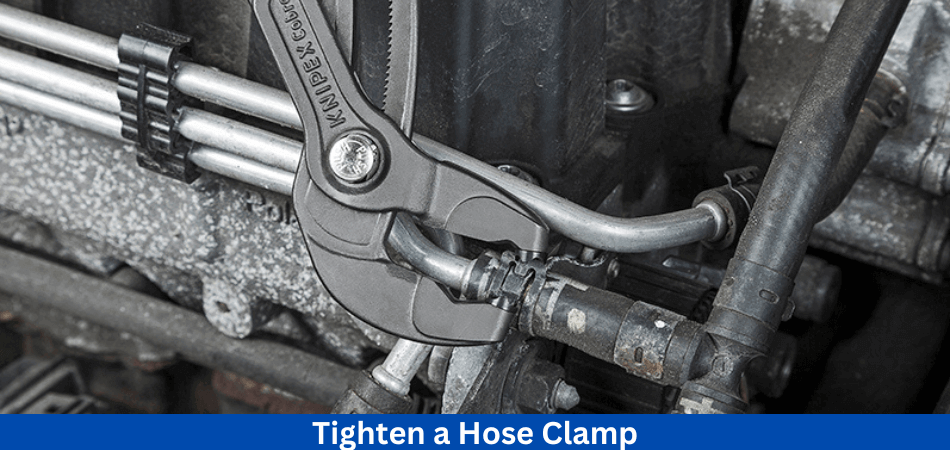
Tighten the hose clamp by turning it anticlockwise with a flat-head screwdriver and hex wrench. Once the clamp separated, continue rotating it. The clamp should positioned over the fitting after being carefully slipped onto the hose. Make sure you have your screwdriver handy again. Ensure that the connection is tight by turning the bolt clockwise.
The purpose of this article is to examine the tools needed for tightening hose clamps in detail. Our guide will also show you how to tighten a hose clamps step by step. Now let’s get started!
Things you will need:
- Flathead screwdriver
- Hex wrench (alternative to a flat-head screwdriver)
Check out these quick tips for tightening hose clamps yourself!
Step 1: Unscrew the Clamp
You will need a flathead screwdriver (or a hex wrench) and a hose clamp. Rotate the screw anticlockwise with the tool. Rotate the clamp until the hose separated while you open it.
Step 2: Position it On the Hose
Make sure the clamp is properly attached to the hose by sliding it on carefully. Attach the hose to the fitting and hold it firmly in place. The clamp needs to positioned in such a way that it will not slide off of the joint with the help of your other hand.
Step 3: Switch the Direction of The Clamp
Make sure the clamp is facing you when you turn it over. By doing this, you will be able to access the screw more easily.
Step 4: Put the Screw Back into Its Sleeve
Reinstall the screw in its sleeve the other, slide the screw into the sleeve that held it before it separated.
Step 5: Tighten the Clamp
The driver should rotated clockwise using a wrench or screwdriver. Once the driver engages, tighten the clamp until the clamp contracts, securing the hose in place.
How To Tighten Metal Hose Clamp?
Things you will need:
- Hose clamp tightening torque
Step 1: Choose the Right Clamp
Metal hose clamps come in a variety of types. A solid metal hose band with buckles is the most common type. This type of connector is ideal when tight connections required.
Step 2: Carefully Position the Metal Clamp onto The Hose
Make sure the clamp is properly attached to the hose by sliding it on carefully. Attach the hose to the fitting and hold it firmly in place. By using your other hand, position the clamp so that it does not slip off the joint.
Step 3: Slide the Driver Back into Its Original Sleeve
Slide the screw into the sleeve that initially held the clamp while contracting it.
Step 4: Tighten the Clamp
The driver should rotated clockwise. Tighten the clamp until the screw and nut engage and the clamp contracts, holding the hose firmly in place.
How To Tighten Radiator Hose Clamp?
Things you will need:
- Screwdriver
- 5/16” nut driver
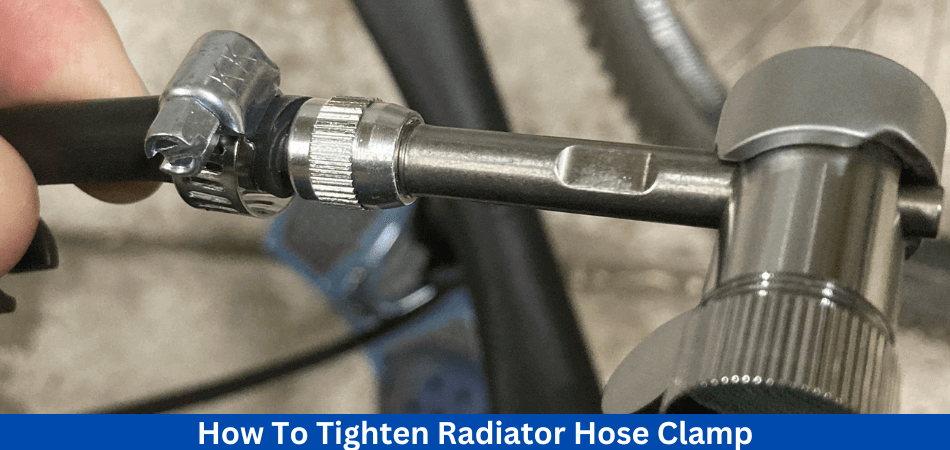
Step 1: Pick an Appropriate Size
A radiator hose clamp’s size is the most important factor to consider. The clamp should sized and typed according to the hose’s diameter.
Step 2: Unscrew the Radiator Hose Clamp
The radiator hose clamp can opened by turning the screw counterclockwise. The best tool for this job is a screwdriver or a 5/16″ nut driver. The slotted band must separated from the screw threads using a screwdriver/nut driver.
Step 3: Fit the Band Around the Hose
Clamp the hose by opening the band completely and sliding it over it. To make it easier to access and use the tools, make sure the screw head faces the right direction.
Step 4: Tighten the Clamp
The screw should inserted into the screw-housing that held the screw before you separated it. Make sure the driver rotated in a clockwise direction. The clamp should tightened until it is securely attached to the hose.
How To Tighten Coolant Hose Clamps?
Things you will need:
- 1/4” rachet
- Philips head screwdriver
Step 1: Locate the Clamps
Radiator clamps are usually located in odd places which makes tightening them difficult. Use different tools to target each clamp if you need to improvise. As a result, it is crucial to know where radiator clamps located.
Step 2: Find the Right Tools
Choosing the right tools is the second steppending on the location of your clamps. Clamps for coolant hoses work well with a 1/4″ ratchet. For the clamps located in the upper areas, you could use a shorter rachet and a regular-sized rachet.
Clamps that are easy to reach can even reached with a Phillips head screwdriver.
Step 3: Tighten the Clamps
The third step is to tighten the clamps, you can push certain pipes out of the way, ensuring you don’t move them out of place too much.
Using the tools you have at hand, position the clamp so that it is easier to tighten. Position the screw back into the sleeve that held the clamp before it separated to contract it. Once the clamp is securely attached to the pipe, continue rotating the driver clockwise.
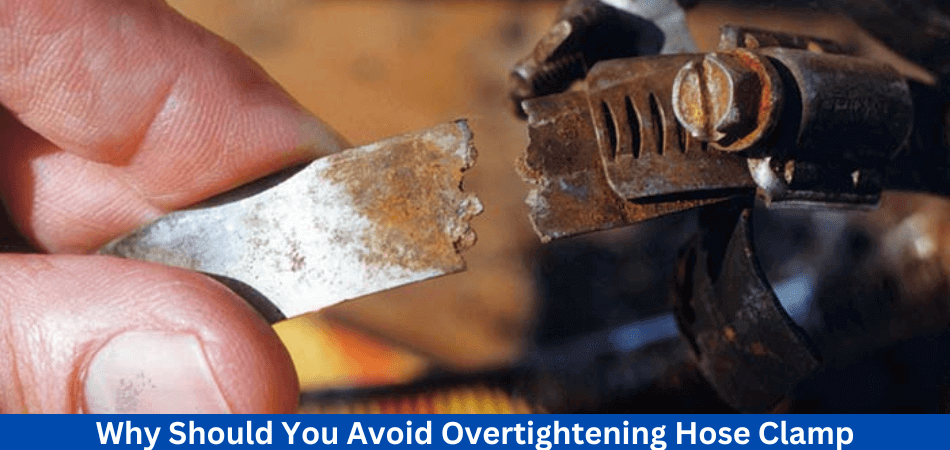
Why Should You Avoid Overtightening Hose Clamp?
As You have learned how to tighten a hose clamp, you might heard a myth that, the tighter the hose clamp, the better. As a result, overtightening can damage both rubber hoses and clamps, as well as increase leakage chances.
For clamp fastening, most OEM parts have constants (Nm) for safety factors of hose and clamp. Depending on the size and usage, these constants will vary.
In a situation where a plastic pipe connected to rubber hose, a user contacted us with the complaint of leakage. According to our investigation, the clamp had been overtightened, resulting in a misshapen plastic pipe. The user forced to replace the entire unit, incurring unnecessary additional costs.
A clamp’s tightness and torque are normally directly related, so that as we tighten it, it becomes tighter. At some point, this direct relationship between input (torque) and output (tightness) stops. As overtightening violates the safety factor of the clamp, excess torque would damage the clamp, hose, or pipe instead.
To ensure clamp torque meets the guideline given for each clamp, a torque meter is commonly used when installing clamps. However, the following technique can used without a torque meter. The clamp is to be screwed only until the hose is slightly below the clamp. After the surface has smoothed, stop screwing. So, AVOID OVERTIGHTENING!
Why It’s Important to Install Your Hose Clamps Properly?
Hose clamps might not be the first thing you think of when considering potential health and safety hazards for vehicles. In certain situations, a hose clamp that has not been installed properly can be extremely dangerous.
In addition to highlighting some of the worst-case scenarios, we also emphasize the importance of proper installation wherever your hose clamps used.
FIRE CAN OCCUR IF HOSE CLAMPS ARE NOT INSTALLED PROPERLY
Excessive tightening of a hose clamp can result in a serious vehicle fire. Overtightened clamps squeeze the hose, causing rubber to extrude and bending the fuel tube itself.
In turn, this can lead to fuel leaks, which are the last thing you want to happen to your car. In the event that this leaking fuel catches alight, the entire vehicle could destroyed.
When hose clamps are improperly installed, most people assume that they are not tightened sufficiently. However, these examples demonstrate that overtightening a hose clamp can also be fatal.
It’s more than just a problem for large vehicles, such as cars or trucks. The excessive tightness of a hose clamp can also cause other smaller vehicles to catch fire. Go-karts and golf carts can found at your local golf course. A seaborne vessel, such as a yacht, could even affected.
Since these vehicles are less likely to undergo regular MOT checks, they can present an even greater safety risk. Likewise, a hose clamp that’s too tight can wear through the material, resulting in a hole in the fuel tank.
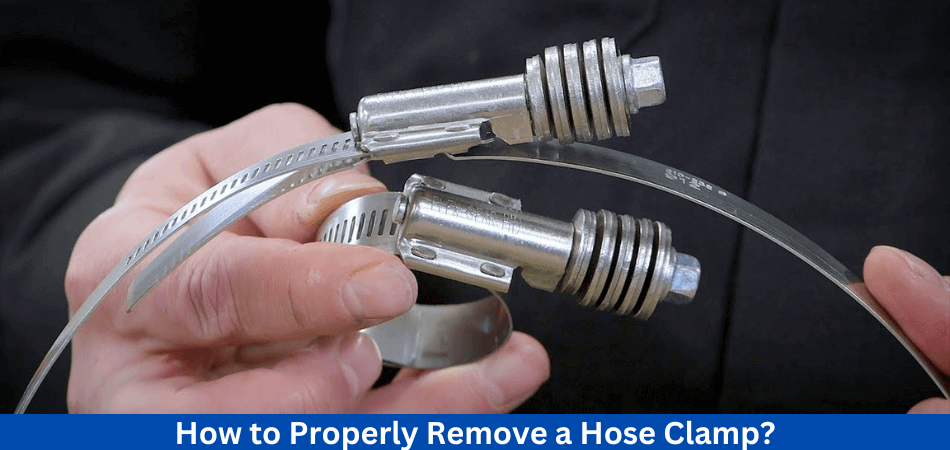
How to Properly Remove a Hose Clamp?
You may have to remove a hose clamp in many situations. Any type of pipe can connected with hose clamps, whether it’s in plumbing, on a vehicle, or on piping of any kind. If the clamp has been on for a long time, it may be difficult to remove. When it comes to removing hose clamps, here are some options to consider.
1. First Identify the Type of Clamp
When it comes to removing an adjustable hose clamp, there are a number of tools that you can use. To remove a hose clamp, you can either use pliers and your hands or a hose clamp removal tool. You may be able to remove the clamp more easily with a hammer and screwdriver if it is too tight or badly corroded. Identifying the type of clamp you are dealing with is the first step in removing a hose clamp. A pinch clamp and a worm-driven clamp are two types of clamps. By using pliers, simply reverse the direction of the arrow on the clamp head to remove the latter. By doing so, it will be easier to remove the clamp from the hose. Pinch clamps must removed with hose clamp pliers, a special type of pliers.
2. Use a tool to remove the hose clamp
It is fortunately possible to remove hose clamps using a specific tool. If you have worked on a car before, you have probably encountered one. Removing hose clamps is one of the most common tasks when working on a car. You can make the entire process easier by using a hose clamp removal tool. You can easily remove the clamp with this tool by slipping it over the hose clamp. This type of tool is available in several forms. Alternatively, you can find ones that adjust to fit any hose clamp size. A locking pliers should used with the tool to secure the clamp during removal.
Can You Remove a Hose Clamp Without Tools?
Yes, in a nutshell. Adjustable hose clamps can removed with your hands only. The hose clamp only needs to twisted in opposite directions by placing your hands around it. You should be able to remove it from the hose once it loosens, then clamps enough to allow you to remove it. It’s also possible that the clamp is too tight. You may not be able to do the job alone with the strength of your hands in such situations. It may be easier to use pliers if that is the case.
Removing an adjustable hose clamp becomes easier if you use the right tools and identify the clamp type. Get in touch with us today if you would like more information.
How to Care for Your Hose Clamp?
- If you overtighten your clamps, you may experience pressure problems in the future.
- Make sure the hose clamps you choose aren’t too large. Even though too-large clamps may still do the job, they can be aesthetically unappealing as well as hazardous.
- If you want to ensure durability, don’t scrimp on the quality of your hose clamps and their installation.
Final Thought: How to tighten a hose clamp?
Now, you might have leaned how to tighten a hose clamp? For anyone who works on plumbing, automobiles, or household repairs, learning how to tighten hose clamps is a valuable skill. This guide will show you how to secure and leak-proof your hose connections by following the steps outlined and using the appropriate tools. Keeping hose clamps in good working order is essential for preventing costly leaks and damage. A mastery of tightening hose clamps will save you time, money, and frustration in the long run, regardless of whether you are a DIY enthusiast or a professional. Remember, with a little practice and the right knowledge, you can tighten hose clamps with confidence.
Read more of our articles here.
FAQs
How often should I tighten hose clamps?
It is a good idea to tighten a hose clamp when you notice a leak around the hose connection or if the hose feels loose on the fitting. A regular maintenance check can also prevent unexpected problems.
How do I tighten a hose clamp?
For most hose clamps, you will need a screwdriver or a nut driver. Using hose clamp pliers is one of the easiest ways to tighten some hose clamps.
Is there a way to identify the type of hose clamp I have?
In addition to worm gear clamps and spring clamps, T-bolt clamps are also available. You can identify the type by looking at the design and tightening method. If you’re unsure, consult the manufacturer’s instructions.
How should a hose clamp be tightened?
The first step is to locate the hose clamp on the hose. Turn the clamp’s screw or bolt clockwise using the appropriate tool. Be careful not to over-tighten the hose or fitting, and continue to tighten until it is securely attached.
What is the recommended tightness of the hose clamp?
Depending on your application and the type of hose material, the ideal tightness varies. A snug, leak-free connection should be created without causing damage to the hose or fitting.