You might be wondering how to remove haze after Wet sanding. Regular cleaning, buffing, and shining are essential for keeping your car’s paint job looking glossy. It’s inevitable that even the most meticulous car owners will find little scratches or scuffs caused by bushes, trees, or even the weather.
Although finding these imperfections on your car’s surface can be disheartening, it does not necessarily require a full paint job.
If a car paint job has lost its natural luster, how can it be restored without a complete repaint? The following article explains the wet sanding process when to use it, and what to do when it doesn’t work. Moreover, it also covers, How to remove haze after Wet sanding.
What is Wet Sanding?
Wet sanding – What is the process intended to smooth out and remove small, surface-level scratches from car paint? Using high-quality wet sanding techniques can create a smooth, like-new finish. The orange peel effect, where car paint becomes uneven and pebbled, resembling orange skin, can also be removed using it.
During wet sanding, dampened sandpaper is used to create an even surface, allowing the existing paint to bleed into any gaps. In some cases, however, it can be difficult to apply the correct pressure and avoid removing any deeper layers of paint.
What are The Common Applications of Wet Sanding?
1. Wet sanding wood
In order to reshape wood surfaces, remove splinters, or straighten uneven wood, people have adopted dry sanding over the years. To give woodwork in homes a glassy and clear appearance, wet sand them. This can be done on cupboards, chairs, tables, or worktops.
The wet sanding of some wood products, such as violins, should be avoided. When wood absorbs water, it becomes swollen or wrapped. Spraying enough water and wiping it off after sanding is the best method.
2. Wet sanding metal
It is the process of wet sanding a metal that gives it a perfect finish. The metal is polished to remove minor defects while improving its shine. It is possible to revive a dull metal by wet sanding it properly after it has lost its luster.
A desirable result is achieved by frequently applying water to the metal surface and the sandpaper while wet sanding.
3. Wet sanding drywall
Drywall sanding with wet sandpapering for different purposes. A room can be prepared either for repairing a small portion or for painting the whole thing. The difference between wet and dry sandpaper can seen despite the longer sanding time. When sanding with a wet sponge, dust can remove during the process, and the wall feels better afterward.
For wet sanding, there are abrasive sponges available, but you can also use a regular sponge.
4. Wet sanding a car
Sanding a car while wett sanding a car is commonly used in auto body shops. A minor defect or deep scratch on a car can repaired with this tool. Wet sanding is useful when painting a car because it removes dust specks and particles.
Wet sanding can also used to fix other imperfections. When sanding a car, quality detergent, fine-grit sandpaper, and water recommended.
What are the Differences Between Wet Sanding vs. Dry Sanding?
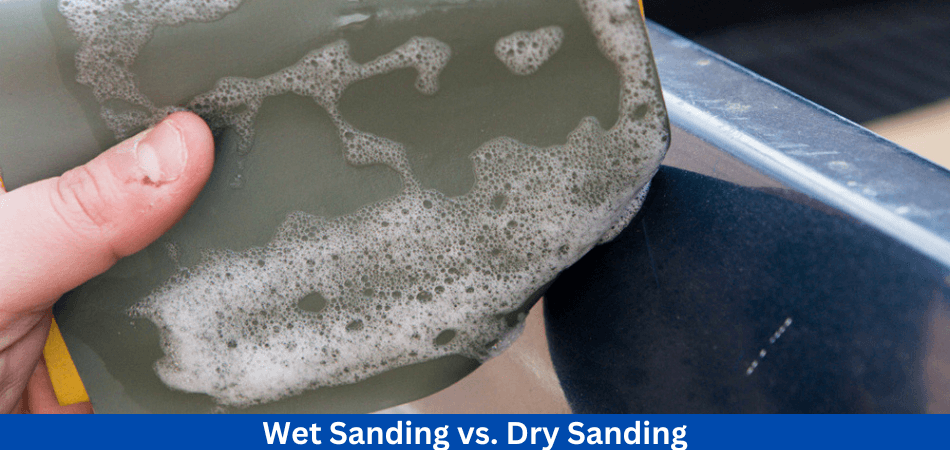
As the names suggest, wet sanding and dry sanding are very different. Let’s examine each process in more detail to understand the differences between them. Dry sanding adds just two elements to the mix for a smooth, lasting finish, while wet sanding just adds another.
Dry Sanding
Sanding without waterooking for a more aggressive approach, dry sanding allows you to take off more material in a quick fashion. Low-grit sandpaper is a great method for roughing in your project’s shape. Most often, small circles will used to remove material and minimize deep scratches when dry sanding by hand or with power tools.
All the dust and debris that fly off the surface during dry sanding can create a huge mess. Except for elbow grease, there is no lubricant needed. When dry sanding, you may need to begin with a lower grit of sandpaper and then finish with a higher grit when wet sanding.
Wet Sanding
Most projects finished with wet sanding. It may take some time to refine the surface with a light touch. Smoothing out details and achieving a more desirable finish are often achieved through wet sanding.
Sandpaper designed for wet sanding isn’t just lubricated with water during wet sanding. If you’re sanding bare metal, you can also use WD-40. To help reduce water tension on your sanding surface, you may even want to add a bit of detergent. Using this method can prevent deep scratches from caused by sandpaper catching.
Sandpaper used for wet sanding usually comes with a backing pad. When water soaks into the pores of the sandpaper, it becomes flimsy and easily folds back on itself. As well as preventing this from happening, the backing pad can also help create a smoother finish than simply using your hands. When wet sanding, your fingers’ ridges and valleys can easily translated to the surface, but not when using a sanding block.
Sanding blocks can also purchased for wet sanding. Sanding drywall is the most common application of this technique. In order to achieve a uniform finish when wet sanding, use linear movements. Every time you pass, you’ll alternate directions. Learn more about wet sanding here.
What are the Equipments Required for Wet Sanding?
Wet sanding requires several tools and equipment. These are as follows:
- Sandpaper
- Sandpaper squeegee/handle
- Bucket and water
- Car cleaning solution
- Sponge
- Microfibre cloths
- Car wax
- Polishing compound
- A buffer
- Cloth tape
Using the in-depth steps below, you can wet sand any scratches or scuffs in your car’s paintwork with the right equipment.
What are the Safety Equipments Required for Wet Sanding?
When wet sanding, dust, and debris are likely to created, so it’s important to take the necessary safety precautions. In addition to safety equipment, here are some things you’ll need:
- Goggles
- Respirator mask
- Gloves
A respirator mask protects your lungs from inhaling harmful particles while goggles protect your eyes from dust and debris. Sandpaper and chemicals used in the process will scratch your hands if you don’t wear gloves.
Before you begin wet sanding, make sure you wear all safety equipment. Priority should always given to safety.
How To Choose Sandpaper for Wet Sanding?
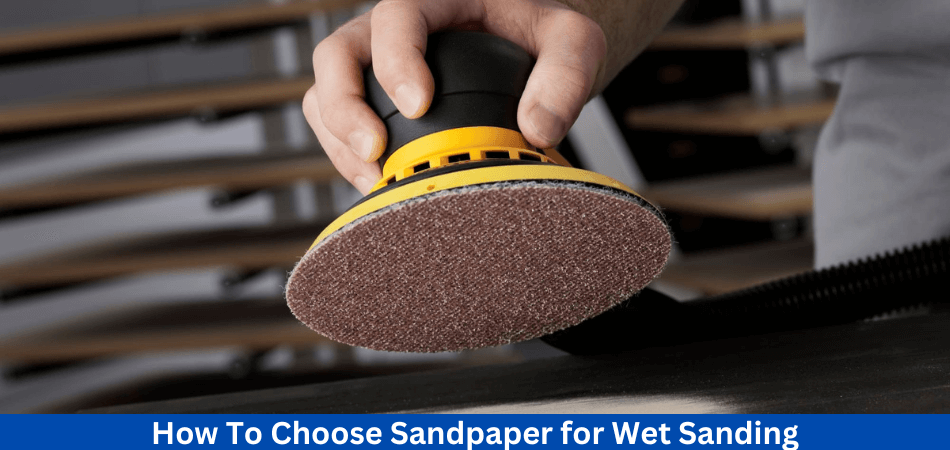
Selecting the right sandpaper is the first step in wet sanding a car. That’s why it’s so important. Therefore, you should pay more attention to the sandpaper you choose.
It is important to choose the right sandpaper for your car from the many types available in the market. As a result, you will damage the paint rather than create a great paint layer. The first thing you should do is check the problem with your car. Sandpaper with a 400-grit rating is a good place to start if you have a rough primer on your car. Using 400-grit sandpaper will remove any bumps on the surface. Sand the car with 600 grits of sandpaper after that.
In another case, 400 grits sandpaper works well when you wet sand a finished paint job. Sandpaper of 800 grits or 1000 grits level would be better in this case. Make sure you choose the right sandpaper for your car. Make sure you choose the right sandpaper when doing this job since a mistake could result in serious car damage. Next, let’s talk about wet sanding a car.
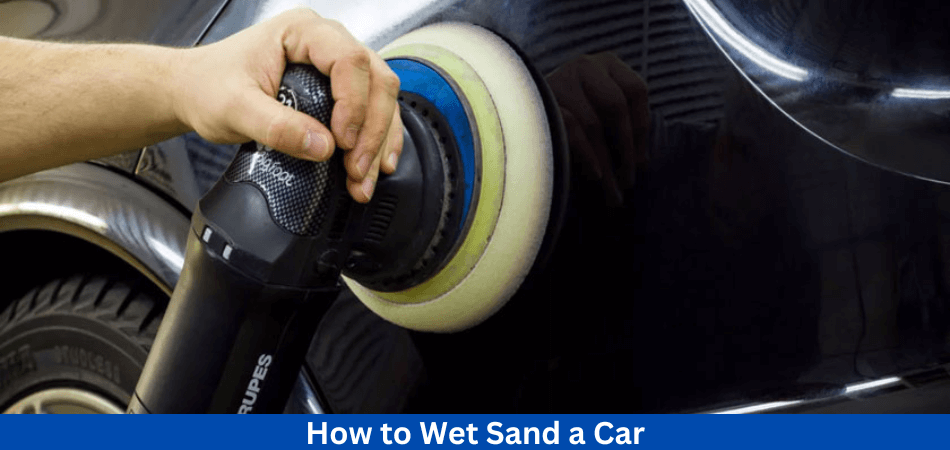
How to Wet Sand a Car: Step-by-step Guide
Step 1: Set up the wet sanding location and car
To wet sand car paint, it is important to find a good location. If you rinse the car, you should choose a place where the water won’t stain the floor and won’t remove some paint. If you are going to wet sand a part, you should clean it with water or soap first. This will give you a clear view of the car part so you can easily get in. Due to the fact that you will be using sandpaper. Sand and dust should not allowed to get stuck in the sandpaper as this will cause more scratches on the paint.
Step 2: Get the sandpaper and cleaning liquid ready
Cut the sandpaper into small pieces after removing it from the package. Depending on the part of the car you are wet sanding, it may be necessary to wet sand it. Meanwhile, prepare a bucket of water. Avoid using automotive soap that also acts as a wax or polish. Dish soap can substituted for automotive soap if you don’t have any. It is necessary to use a lubricant when wet sanding to prevent the sandpaper from burning the paint.
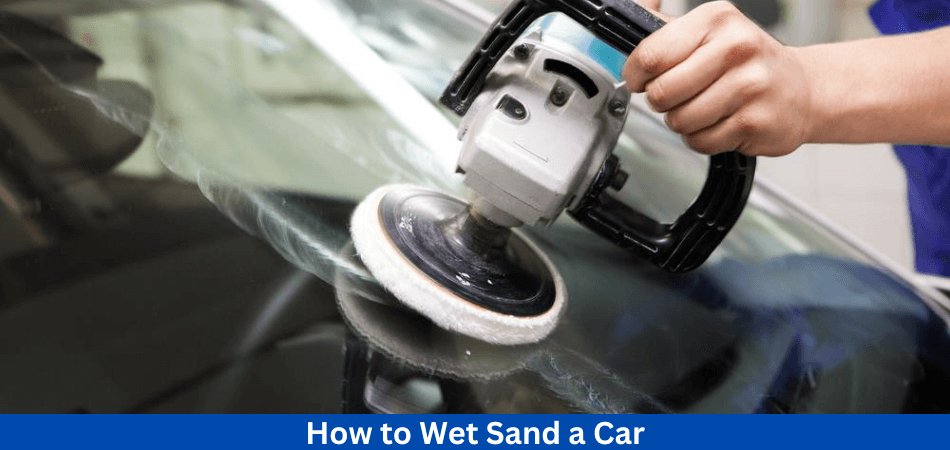
Step 3: Soak each sandpaper sheet for five minutes
Sandpaper must soaked for 5 minutes after being wet sanded for the third step. Place the sandpaper sheets along the edge of the bucket so half of each sheet soaked in soapy water. While the halves that are soaking in water should be completely submerged in soapy water, the dry part will help you secure the sandpaper.
Step 4: Start wet sanding
It is not a good idea to wet sand your car by hand. If you want to sand, you should use a squeegee or pad. It will prevent an inconsistent finish if the sandpaper placed on the sand pad. You can now start sanding gently in circular motions with a light amount of pressure. The paint surface should checked again after a few circles. It may be necessary to apply a little more pressure if the sanding does not seem to affect the clear coat. You will scratch your car if you put too much pressure on it. You will expend less energy if you sand your car gently to reduce blemishes.
Step 5: Use multiple directions to move the sandpaper
So The sandpaper needs to moved around now. To catch different angles, it’s a good idea to switch the direction of your circular motions periodically. As a result, the paint surface is even throughout. Sandpaper should not applied with different pressures in this step. You can check if you are applying the right pressure. The color of the paint should bleed into the water and tint it a little. The water will turn darker if you sand too hard. If you want to sand a larger area, you can add more water.
Caution:
- Your tools’ edges should handled with care.
- Take frequent breaks
- You should avoid scratching the paint with the handle of the tool or one of the edges of the sandpaper.
Step 6: Repeat The Process
So The car paint has already sanded. To ensure that the paint is evenly applied, repeat the process with a higher grit sandpaper. After the first stage of wet sanding, this will help remove any shallow scratches or abrasions.
In addition to sanding the car, this step also gives you the opportunity to repair any damage you have caused. There is, however, a limit to how much damage can fixed. During the sanding process, try to minimize mistakes.
Step 7: Clean the sand area
Your car should rinsed after sanding and resanding. Any soap or debris left on the vehicle should rinsed off with a hose. You will need to apply a glaze or wax once it dries, so be sure to rinse it thoroughly.
Step 8: Time for Buffer and Rubbing Compound To Polish
So The next step is to apply some rubbing compound to a buffer pad and then polish the area with a power tool. When buffing the rubbing compound into the paint, turn on the rubber, use a medium speed, and apply light pressure.
Do it gently, strong pressure on the paint can burn it, so start lightly and add more pressure only when necessary.
Step 9: Apply The Wax
As a final step in wet sanding a car, wax should applied to the paint layer. When you apply wax to the paint, it looks like the finished product even after buffing. You can think of it as a paint protection. Be sure to use high-quality automotive wax when sanding. Adding a wax layer can also help prevent the buffed area from fading at a different rate than the rest of the paint.
How To Know When To Stop Wet Sanding?
It’s important to be attentive when wet sanding; otherwise, your base coat can damaged. To cover the damage you have caused, your car will need to repainted.
Water can sprayed on the surface area to check your progress, and then a microfiber cloth can used to dry it. By doing this, you’ll be able to see how much more work you need to do.
The bucket water should also turn somewhat milky when the clear coat removed. There should be no color change in the water if there is no clear coat.
In both cases, color fragments in the water damage the car paint, which needs to repainted.
Tips for Achieving the Best Results During Wet Sanding
Are you looking to improve your wet sanding skills? We’ll explain how to achieve a high-quality finish in the following sections.
- Slow motion close-up of tattooing hands preparing the hood of a deep blue sports car for polishing
- Protect adjacent panels with cloth tape: Wet sanding can concentrate on specific panels, so using cloth tape can ensure that the non-damaged panels remain intact.
- Sanding machines might seem time-saving, but they can leave swirls in the paint and provide much less control than hand-sanding.
- When starting to sand, apply gentle pressure: You don’t want to damage your car’s paint by sanding too deep.
- If the sandpaper rubbed in back-and-forth motions using the same pressure levels, you can achieve an evenly sanded surface much more quickly.
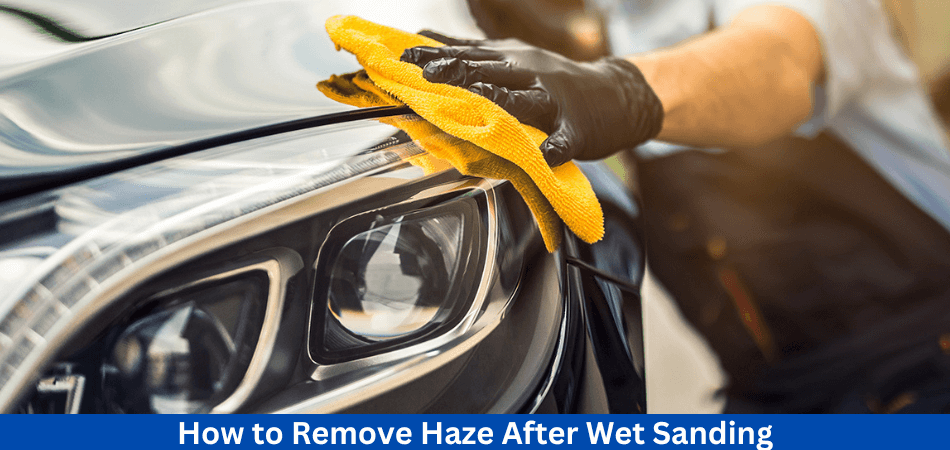
How to Remove Haze After Wet Sanding? Guide Explained!
The rubbing of compound, wax, and grime on the surface of the car can cause hazing over time. Paint can become unattractive as a result. So How to remove haze after Wet sanding.
Well, you can remove hazing from your car’s paint with several products available on the market.
In order to remove the haze, you will need the following:
- Sandpaper (1500 and 2000 grits)
- Dupont compound
- Water
- Microfiber towel
- Dupont 7 polish
- Turtle wax
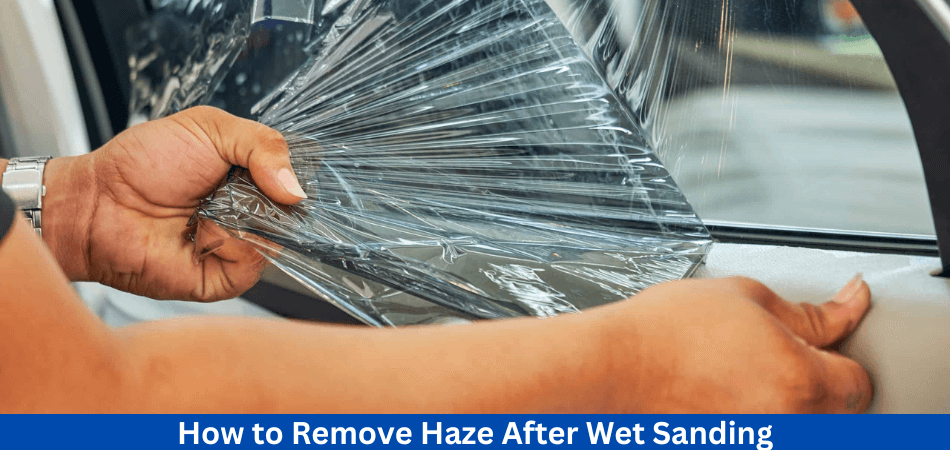
After wet drying, you need to remove the haze as follows:
- You won’t get a good finish if you use 1200-grit sandpaper. Sandpapers with 1500 and 2000 grit should be used. If you use 1200-grit sandpaper, you will need a compound that is aggressive to remove a lot of paint just to remove deep scratches. Quality paper, such as Meguiar’s Nikken 2000 grit, makes haze removal easy and fast.
- The Dupont compound should be used alongside a new 1-inch wool wheel on a Sioux buffer. When you sand, you will be able to remove cuts and scratches more easily.
- The compound residue can removed with a 50/50 solution containing isopropyl and water.
- Dry the surface with a microfiber towel and run your fingers through it to make sure the haze has removed. It might be necessary to repeat the process if the haze is still present or the surface is not smooth.
- To bring out the beauty, use a 2-inch wool thickness wheel, along with Dupont 7 polish. As a result, compounded wheels will no longer leave marks on the surface.
- To further remove hazing, use a high-grade wax such as turtle wax. Immediately after waxing, wash your car and thoroughly dry it.
- It is going to be an amazing result in the end. There should be a deep shine on it as if it polished glass. This is how to remove haze after Wet sanding.
Note: Keep your car out of direct sunlight when waxing. It is possible to scratch the paint easily when it heated by the sun.
What are the Benefits of Wet Sanding A Car?
1. Remove Deep Scratches
As a first step, it can help remove deep scratches. You can benefit from wet sanding your vehicle in this way. In addition, it can remove any debris that may have fallen on the freshly painted surface. Also, orange peel can removed by wet sanding.
2. Even Out new Paint
In some cases, new paint requires a few touch-ups, and wet sanding is an effective method to achieve an even finish. It is often used by professional automotive detailers to ensure that your car appears in pristine condition.
3. Level Touch-Ups for Easy Polishing
You can also use wet-sanding to level touch-ups on your vehicle, which makes polishing much easier. Wet sanding should always handled by a professional who specializes in the process. If you attempt to do this on your own, you run the risk of permanently damaging your vehicle’s paint.
What are the Potential Risks of Wet Sanding?
Wet sanding: What are the risks small scratches can be a great way to restore the paint job and achieve a smooth, glossy finish without having to take it to a professional. You should, however, be aware of the potential risks associated with this process.
- You can further damage the paint job of the car if you use the wrong materials or tools.
- If the paint sanded or buffed incorrectly, it may become uneven or discolored.
- Paint can become scratched or dull if not applied correctly.
Can You Do Wet Sanding with Soap?
While wet sanding your car, you should use soap instead of water. When you add soap to the wet sanding process, you can gain several benefits.
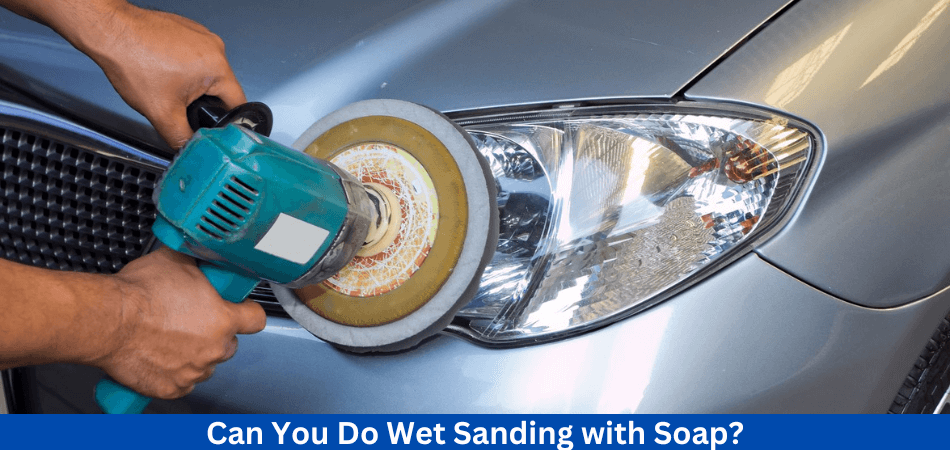
Reason 1: Lubrication
By lubricating the sandpaper, soap can reduce the amount of heat and friction generated during sanding. By adding soap, you make it easier to work on the surface, which reduces the risk of damage to the paint and body of the car.
Reason 2: Improved Finish
The second reason is that the finish has improved to produce a smoother, better finish on a surface. When it comes to car paint, this is especially true.
Reason 3: Reduced Dust
It is possible to reduce the amount of dust that generated during the sanding process by wet sanding with soap. The surface can seen and worked on more clearly as a result.
How to Know If Wet Sanding is Right for You?
Paint scratches and imperfections can’t all fixed by wet sanding. It can be difficult to repair scratches deep enough to expose the metal layer, for example. The use of wet sanding alone would not suffice for these cases.
In general, this method can used to restore scratches or imperfections in the clear coat or upper layers of paint.
When You Should Not Wet Sand Your Car?
By wet sanding your car, you will be able to save the paint layer. In some cases, you should not sand your car. When your car paint scratched too deeply, it’s time to fix it. Thus, sanding your car is more likely to cause harm than good if you insist on doing so. You should not do it if your car has a deep scratch.
Conclusion: How to remove haze after Wet sanding
Now you have some idea of How to remove haze after Wet sanding. To avoid regrets, wet sanding or removing haze after wet sanding should be done properly. Care must be taken to follow the processes meticulously.
After wet sanding, it can be disappointing to experience haze. When the steps are not followed properly, removing it can also be stressful. It is important to take your time when working on the car paint and to avoid damaging it.
Wet sanding your car or removing the haze after wet sanding will not be difficult if you follow the process. To remove the haze or wet sand in your driveway, you can always hire a professional. You will spend some money, but if you are an amateur, you will not have to deal with the stress and damage to the vehicle’s exterior. Read more of our articles here, like “How to Remove Haze After Wet Sanding”
FAQs
What causes the haze to form after wet sanding?
It formed when fine sanding particles and debris mixed with water during wet sanding and then dry on the surface, resulting in a cloudy or hazy appearance.
How can I prevent haze from forming during wet sanding?
Sandpaper should always be clean, the surface should be rinsed frequently during the process, and haze should minimized. It is also possible to prevent excessive haze by using the right sandpaper grit and technique.
How do I remove haze after wet sanding?
A buffer or polishing machine (optional) may also needed along with clean water and clean, soft cloths or microfiber towels.
What is the first step in removing haze?
Remove any loose particles from the sanded surface by thoroughly cleaning it. On a clean cloth, apply a small amount of polish or compound.
To remove haze, what type of polish should I use?
Make sure you choose a polish or compound that is specifically designed for the material you are working on. For example, automotive clear coats require different products than wood finishes.