You might hear the word “C-clamp” when servicing cars. So, you may have been curious about what a C-clamp for brakes is. How big is the C-clamp for the brakes? But there are so many sizes and kinds of C-clamps on the market; how do you know what size C clamp for brakes suits your job?
Well, you will need a 6- or 8-inch C-clamp to crush brake calipers the right way. It will help ensure the brake calipers are tight enough and the brake pads make good contact with the wheel.
A “C-clamp” is a specialized instrument to secure braking components during maintenance or replacement. If you have a C-clamp, you can easily maintain your brakes.
The decision of what size C clamp to use for the brakes sometimes needs to be clarified. The size and type of C-clamp you need will depend on the brake’s power and the potential necessary effort to operate it. Well, you’ve got covered!
We’ll discuss everything you need to learn about the what size C clamp for brakes and types of C-clamps & how to choose one!
What Is a C-Clamp?
We use C clamps for a variety of tasks. When replacing brake pads, you need a solid C clamp to grasp the place firmly and exert sufficient pressure to return it to its original position.
The device consists of a metal bar with movable jaws at one end and a screw at the other. The jaws hold the object firmly by inserting the bar into the jaws and tightening them.
As a result of their versatility, C-clamps can be used for various tasks, such as gluing wood boards together and holding a workpiece, so it can be sawed while the glue dries.
Without a strong c clamp, there is a chance that the pad got damaged or, worse still, made utterly useless.
Understanding the C Clamp and Its Purpose for Brakes
The C clamp is a very versatile tool used for a variety of purposes. One of its most common uses is for brakes. When it comes to using a C clamp for brakes, there are a few things you need to understand in order to get the most out of this tool.
The first thing to understand is the purpose of a C clamp for brakes. A C clamp is used to apply pressure to the brake pads in order to create friction and stop the wheel from rotating. This tool is especially useful for cars with disc brakes, as it allows you to apply pressure to the brake pads without having to remove the wheel.
The second thing to understand is how to use a C clamp for brakes. When using a C clamp for brakes, you need to make sure that the jaws of the clamp are parallel to the brake pads. This will ensure that the pressure is evenly distributed and that the brake pads are able to create maximum friction.
Once you have the C clamp in place, you need to tighten the clamp until the brake pads are firmly against the rotor. You should then test the brakes to make sure that they are working properly. If they are not, you may need to tighten the clamp even further.
It is important to note that you should never use a C clamp to compress the brake caliper. This can cause damage to the caliper and will result in decreased braking performance.
If you are not familiar with using a C clamp for brakes, it is best to consult a professional mechanic. They will be able to help you properly adjust the clamp and ensure that your brakes are working properly.
What Size C Clamp for Brakes?
What size C clamp for brakes be used? The throat depth indicates the size of C-clamps by measuring the distance between the screw and the clamp frame. You should consider two factors when choosing a C-clamp for your brakes: its diameter and length.
The diameter must be big enough to slide over the brake pad. The length is critical because of the necessity of a large brake pedal surface area.
When it comes to your brakes, what size C-clamp for brakes? Well, A 6-inch clamp will be adequate for a vehicle such as a compact car. Larger vehicles, such as SUVs and trucks, require an 8-inch clamp.
Remember that a shorter clamp may not offer enough surface area to exert enough pressure, but you can always use a longer clamp for greater leverage.
How To Choose The Right C-clamp?
Since C clamps come in various sizes, materials, and qualities, selecting the right one for your car can be challenging. So, the following are some factors to consider while choosing your C-clamp brakes:
First, consider the usage. Your primary concern should be identifying the objective for which you require the C clamp. Brake pad adjustments and replacements are only two examples of the many uses for a C-clamp.
You don’t need a professional-grade C clamp to compress brake calipers or swap out brake pads.
So, be sure what you need precisely & then act upon it.
Next, you’ll need to settle on a C clamp’s size. The width of a C clamp can be anywhere from one inch to twelve. The inches indicate the size of the clamp’s opening.
The C-clamp’s holding power is measured in inches and the clamp’s length. When operating in confined areas, this is of paramount importance. Ensure adequate room between the brake pads and your fingers or whatever else you’re clamping.
How to Position the C Clamp on the Brake Caliper?
When working on your car’s brakes, it’s important to use the correct tools for the job. One such tool is the C clamp, which is used to position the brake caliper. Here’s how to use a C clamp for brakes:
- Begin by positioning the C clamp on the brake caliper. The clamp should be positioned so that it is resting on the brake pads.
- Next, use the screws on the clamp to tighten it down. Be sure to use caution when tightening the clamp, as you don’t want to damage the brake caliper.
- Once the clamp is in place, use a wrench to loosen the brake caliper bolts.
- Finally, use the wrench to adjust the brake caliper until the brake pads are in the correct position. Be sure to use caution when doing this, as you don’t want to damage the brake pads.
When finished, be sure to tighten the brake caliper bolts and release the pressure on the C clamp.
Finally, think about what your clamp will be touching. Since C clamps have multiple uses and are available in various materials, they are cheap, even for low-power applications.
Some clamps are composed of steel, while others are made of softer metals that won’t damage sensitive surfaces. The metals used to make the C clamp decide how strong and long-lasting it is.
Chrome and zinc-plated clamps are indispensable and last for a long time. However, the C clamp’s manufacturing material could drive up expenses significantly.
What are the Different Type Of C-Clamp
There are many C-clamps, each designed for specific uses, such as regular C-clamps, deep throat C-clamps, welding C-clamps, spring clamps, pipe clamps, etc.
For example, the regular clamp is the most basic and common type of C-clamp. It has a screw mechanism and a stationary frame shaped like a “C.” They’re versatile and used for various general clamping tasks.
Deep throat clamps are helpful when you need to reach deeper areas or clamp around bulky objects.
Welding C-clamps are typically made of heat-resistant materials and have a higher clamping force to withstand the heat and pressure generated during welding. They often have a copper or brass pad to prevent damage to the workpiece.
Pipe clamps hold together pipes and tubing, and spring clamps quickly secure light objects. There are also specialized clamps for storing electronic components during soldering or holding tubes during threading operations.
How To Use A C-Clamp?
The usage of the C-clamp is relatively easy & forthright! Follow the steps:
- Place the clamp’s jaws on either side of the thing you want to hold.
- Put the bar into the jaws through the holes.
- Tighten the bar until the jaws hold the object firmly but not too tightly. It’s important not to tighten the clamp too much because doing so can hurt both the clamp and the thing it’s holding.
- After tightening, ensure the objects are securely held together or anchored to the surface. Gently try to move or shake things to remain stable.
- Finally, loosen the bar to release the object. Rotate the screw handle counterclockwise to remove the C-clamp, lessening the pressure. Once the pressure is released, you can remove the clamp from the things.
How To Compress A Brake Calipers?
Though it’s an easy process, you must gather some tools first to compress the brake calipers. Those are listed below:
- Get a clamping device such as a C-clamp.
- Have a clean rag ready.
- By consulting your owner’s manual, ensure you use the correct brake fluid for your car.
- Prepare a socket wrench.
- Optionally, have an assistant available.
Here are the steps you need to follow after gathering all the necessary tools:
- Your wheel needs to have a caliper with two pistons to compress. During this stage of the process, the first thing you’ll need to do is remove one of the wheels from your vehicle so that you’ll have more room to work.
- In other cases, you may need to remove the wheel before accessing the caliper to compress it. With it, you can access the brake caliper without affecting other car parts.
In addition to securing the clamp to one of the discs with a C-clamp, using pliers at the other end is necessary. Using a C clamp for the first time at home could be difficult.
How to Remove and Replace Brake Pads or Rotors with the C Clamp?
A C clamp is a versatile tool that can be used for a variety of purposes in the garage or workshop. In this article, we will focus on how to use a C clamp for brakes.
Removing and Replacing Brake Pads or Rotors with the C Clamp
If you need to remove or replace the brake pads on your car, or the rotors, you can use a C clamp to do the job.
To remove the brake pads, you will need to use the C clamp to compress the brake piston. First, use a wrench to loosen the brake caliper bolts. Then, use the C clamp to compress the brake piston. You may need to use a blunt object like a screwdriver to help you push the brake piston in. Once the brake piston is compressed, you can remove the brake pads.
To replace the brake pads, you will need to do the same thing. First, loosen the brake caliper bolts with a wrench. Then, use the C clamp to compress the brake piston. Push the brake pads into the caliper and then tighten the brake caliper bolts with a wrench.
To remove the rotors, you will need to use the C clamp to compress the brake piston. First, loosen the brake caliper bolts with a wrench. Then, use the C clamp to compress the brake piston. You may need to use a blunt object like a screwdriver to help you push the brake piston in. Once the brake piston is compressed, you can remove the rotors.
To replace the rotors, you will need to do the same thing. First, loosen the brake caliper bolts with a wrench. Then, use the C clamp to compress the brake piston. Push the rotors into the caliper and then tighten the brake caliper bolts with a wrench.
How Inspect and Test Brake Functionality after Using the C Clamp?
When working on a car, there are a few key pieces of equipment that are essential for the job. One of these is the c-clamp. This tool can be used for a variety of purposes, including securing hoses and cables, and holding objects in place. In this article, we will discuss how to use the c-clamp for brakes.
Brake functionality should be inspected and tested after using the c-clamp. This is important to ensure that the brakes are working properly and that no damage has been done. There are a few steps that need to be followed in order to complete this task.
The first step is to remove the wheel. This can be done by loosening the lug nuts and then removing the wheel. If the wheel is stuck, it may be necessary to use a jack to raise the car and then remove the wheel.
The second step is to remove the brake caliper. This can be done by loosening the two bolts that hold it in place. Be sure to use a socket wrench to do this, as a regular wrench may not be strong enough.
The third step is to inspect the brake pads. They should be checked for wear and damage. If the pads are worn down, they will need to be replaced. If there is damage to the pads, they will need to be repaired or replaced.
The fourth step is to clean the brake rotor. This can be done by using a wire brush to remove any dirt or debris. Be sure to clean both the top and the bottom of the rotor.
The fifth step is to reattach the brake caliper. This can be done by tightening the bolts that hold it in place. Be sure to use a socket wrench to do this, as a regular wrench may not be strong enough.
The sixth step is to reattach the wheel. This can be done by tightening the lug nuts. Be sure to use a socket wrench to do this, as a regular wrench may not be strong enough.
The final step is to test the brakes. This can be done by driving the car in a safe location and applying the brakes. They should feel responsive and should stop the car quickly. If there is any hesitation or if the brakes do not stop the car quickly, there may be a problem that needs to be fixed.
Warnings When Using a C Clamp for Brakes
Working on your vehicle should always be done with safety in mind. The following tips will help you stay safe:
Make sure you use the correct size C-Clamp: If you use a C-Clamp that’s too small or too big for your brake caliper, it can damage it. Make sure the size you’re using is correct.
You should apply equal pressure when tightening the C-Clamp. A piston or caliper can be damaged by too much pressure on one side.
Be patient: Don’t rush. Accidents can happen when we rush, and mistakes can happen when we rush.
Don’t forget to wear protective gear: safety glasses and gloves are always a good idea. Unless you keep your skin and eyes away from brake fluid, you may be exposed to harmful substances.
If a C-Clamp is not used properly, it can damage your brake caliper or piston, leading to poor performance or even brake failure.
What are the Safety and Precautions when Using the C Clamp?
There is a reason that c-clamps have been around for so long – they are incredibly versatile tools. But, as with any tool, there are some safety precautions you need to take when using a c-clamp.
The most important thing to remember when using a c-clamp is to use the right size clamp for the job. If the clamp is too small, it can damage the object you are trying to clamp. If the clamp is too big, it can be dangerous to use, as it can easily crush your fingers.
When using a c-clamp, always make sure the screws are tight. If the screws are loose, the clamp can slip and cause injury.
Never use a c-clamp to clamp two objects together. This can cause the objects to become stuck together and can be very difficult to remove.
When using a c-clamp to clamp a brake, always make sure the brake is in the correct position. If the brake is not in the correct position, the c-clamp can damage the brake.
If you are not sure how to use a c-clamp, ask someone for help. It is always better to be safe than sorry.
What are the Tips for Proper Maintenance and Storage of the C Clamp?
A C clamp is a very handy tool to have in your tool box, especially if you work on cars or brakes. It is a clamp that is used to secure things in place. It has a screw in the middle that you can tighten to clamp whatever you are holding onto.
There are a few tips for proper use and maintenance of the C clamp. First, make sure you always use the correct size C clamp for the job. If it is too small, it won’t be effective, and if it is too big, it could damage the object you are trying to hold in place.
Second, always make sure the screw is tight before using the C clamp. This will ensure that it is secure and won’t slip.
Third, make sure you use the C clamp in the right direction. If you are trying to hold something in place, the C clamp should be tightened against the object. If you are trying to pull something apart, the C clamp should be tightened on the other side.
Fourth, make sure to use the C clamp in a stable position. If it is not stable, it could slip and cause damage or injury.
Finally, make sure to store the C clamp in a safe place when not in use. Don’t leave it out where someone could accidentally step on it or run into it.
The C clamp is a very handy tool, but it is important to use it properly and to store it safely. With these tips, you can use your C clamp safely and effectively for many years to come.
Final Thought: what size C clamp for brakes!
Now you might have a great idea of what size C clamp for brakes should be use. Your vehicle’s brakes are an essential component that, with time, might become loose or need to install new brake pads. You will need a C clamp to accomplish it. Because C clamps are such a versatile tool that we use them for various tasks, there is a vast selection of them on the market that come in multiple sizes, materials, and strengths. What Size C Clamp for Brakes should be used.
In this article, we have discussed all about C-clamps. Now you know everything about C-clamp & how to choose one! When selecting a c-clamp, keep those considerations in mind so that you can pick one that will function well for the application you have in mind.
FAQs
How to measure C-clamp size?
The jaw capacity is the maximum width of an object which can be clamped in a C-clamp with the screw fully extended. Most have jaw openings anywhere from 2″ to 10″. The depth of the throat, or the distance from the screw’s axis to the face of the frame, is also crucial.
Can a brake caliper be compressed with a C-clamp?
C-clamps are helpful for compressing brake calipers. Insert the piston into its housing and secure it with the clamp. But this is only sometimes the case. Not all calipers can be pushed into place; some must be screwed in.
Why aren’t my disc brakes working correctly?
There are several potential causes of a power outage. Possible causes include:
Air in the system that needs to be bled.
- Excessive pad wear.
- A dirty rotor.
- Contamination of either the pads or the rotor.
C or V brakes, which one’s better?
Brakes with a cantilever design are relatively easy to fine-tune. Cantilevers prefer V brakes in muddy conditions due to the latter’s greater clearance. In addition to being more durable, V-brakes are also more user-friendly.
What do you think a brake clamp is?
The brake pads and pistons are located inside the caliper. It reduces wheel speed by increasing friction between the braking rotors and the wheels. The rotor of a revolution is clamped by the brake caliper whenever the brakes are applied.
Auto technicians worldwide know a fundamental truth: the oxygen sensor is significant to your vehicle’s exhaust system. Often underestimated and relatively affordable to replace. This compact sensor is vital to maintaining your engine’s seamless operation. It is also free from harmful emissions. But often, people ask, “What happens if I unplug my O2 sensor?”
We know the oxygen (O2) sensor plays a crucial role in the car’s emissions control system. Its primary function is to measure the oxygen content in the vehicle’s exhaust, transmitting this information to the engine control unit (ECU). Subsequently, the ECU adjusts the air/fuel ratio to achieve optimal stoichiometry. This process leads to reduced emissions and improved fuel efficiency.
Now back to your question: what will happen if you unplug it? The answer is that without the O2 sensor, the ECU loses access to data regarding oxygen levels in the exhaust. Consequently, the ECU may enter “limp mode,” where it defaults to a rich air/fuel mixture not optimized for fuel economy or emissions. That can result in increased emissions, diminished engine performance, and heightened fuel consumption.
Want to learn more? Then keep scrolling.
What Is O2 Sensor Exactly?
The O2 sensor, also known as the oxygen sensor, it’s an essential component of a vehicle’s exhaust system. Its primary function is to gauge the oxygen level in the discharge gases. This valuable data then transmitted to the engine control module (ECM) for analysis.
With this information, the ECM can effectively regulate the fuel-to-air ratio during ignition, striving to achieve an optimal balance. The engine’s performance optimized by fine-tuning this ratio while minimizing harmful discharge gases’ release.
How Does Your Car Use Oxygen?
Your car engine generates power by igniting fuel and generating combustion. As a result of this combustion, oxygen absorbed. A bigger combustion requires more oxygen, which required for more power. By the car’s air intake, atmospheric air sucked into the combustion chamber, whereas fuel is injected into it.
Through the exhaust system, toxic exhaust gases will exit the car after combustion. During combustion, carbon monoxide, hydrocarbons, and oxygen released as exhaust gases.
What’s The Function Of O2 Sensor?
Fuel and oxygen must delivered to the combustion chamber in an optimal amount. The combustion process and the performance of your car are limited by insufficient fuel. Unburned fuel discharged into the exhaust system when too much fuel is burned, resulting in waste and pollution.
A sensor that measures oxygen (O2) plays a key role in this process. Measurement of Oxygen in exhaust gases performed by an O2 sensor. Using this data, the car’s computer will determine how much fuel to inject next by sending it to the ECU (electronic control unit).
An excess of oxygen in the combustion chamber indicates that there is not enough fuel. A combustion chamber with too much fuel has too little oxygen left over, while a chamber with too much oxygen has too little fuel left over. Other factors are also used by the ECU to determine how much fuel needs to be injected, but the O2 sensor is the most important.
The oxygen sensor should be located right before the catalytic converter in the exhaust system of a car. In a car, at least one oxygen sensor is usually present – especially in vehicles with larger engines. On the exhaust manifold, there are additional sensors. Oxygen sensors are located in each cylinder.
What Happens If I Unplug My O2 Sensor?
If you unplug the O2 sensor, the check engine light may come on, and the vehicle’s internal diagnostics system may also notice that the sensor is broken. Running your car with an O2 sensor that isn’t plugged in could also hurt your catalytic converter, which cleans your exhaust of harmful pollutants.
O2 sensors are an essential component of your car’s emission control system. But if a gauge isn’t working well, it can affect how well your car runs. It might even make you fail a pollution test.
What Are The Symptoms Of A Bad O2 Sensor?
The O2 sensor is what determines whether your car injects too much or too little fuel. If the sensor fails, your car won’t know if it should inject more fuel or less fuel. Many different things can happen as a result of this.
Check Engine Light Turned On
A malfunctioning O2 sensor will be detected by your ECU. As a result, the check engine light will come on. An O2 sensor does not always have to be bad for this to occur. There are many other reasons why the check engine light can come on – so bring your car to a mechanic if you don’t know why it’s on.
Reduced Performance
O2 sensors can also malfunction suddenly, resulting in a reduction in performance. Your car would keep driving with a restricted fuel supply without an O2 sensor, resulting in a lack of fuel injection in your engine.
Bad Fuel Economy
This point is the exact opposite of the one above. ECUs are unable to detect that they are injecting too much fuel if they do not have an O2 sensor – resulting in your car continuously wasting fuel. Alternatively, you might be able to tell by looking at your exhaust fumes – they might appear darker. Through the exhaust system, unburned fuel leaves the car.
Failed Emission Test
Your exhaust gas should be mainly water vapor and carbon dioxide if you have a working O2 sensor and a Catalytic Converter. The exhaust may fail the emission test now that you have wasted fuel leaving your vehicle. Also state may require you to perform regular emission tests, so it’s especially important to do this.
Contaminant
It is possible for O2 sensors to go bad if they are exposed to too many contaminates in the air. In this case, contaminants enter the engine through a dirty air filter or a performance air filter that’s too open. As a result of these contaminants, O2 sensors become less sensitive due to wear and tear damage or simply accumulate on them. I have an article about performance air filters – the pros and cons, if you’re interested.
Wear And Tear
A component like an oxygen sensor wears out over time. It is recommended that they be replaced every 90,000 miles. Due to the exhaust gases, the O2 sensors are subjected to high temperatures and pressures, causing wear and tear. You’ll need to replace your O2 sensors after 90,000 miles because they’ll no longer be as sensitive.
How to Fix a Malfunctioning O2 Sensor?
Start by using a heat gun or torch to warm the threads on the base of your sensor. It will become more pliable as a result, making removal easier.
After that, press down firmly on the button connecting the sensor’s cord to the plug using a flathead screwdriver. This makes disconnecting and reconnecting this cable to the sensor easier.
Third, lubricate the threads and base of the sensor with an impermeable oil. It should allow it to become more flexible so that you can remove it.
Additionally, exercise caution while you remove the oxygen sensor. Wear protective gear and steer clear of lifting or bending the car excessively.
Can I drive with the O2 sensor unplugged? What Happens If I Unplug My O2 Sensor?
Disconnecting the O2 sensor won’t make a car run any better. However, this O2 sensor is vital to the car’s emissions system, analyzing exhaust gas oxygen levels and sending the data to the car’s computer.
The computer uses this information to adjust the fuel-to-air ratio for maximum effectiveness and efficiency.
There are some drawbacks you can face while unplugging your O2 sensor, discussed below:
Higher emissions
Higher emissions result from the engine control unit’s (ECU) inability to accurately adjust the air/fuel ratio without a functioning O2 sensor. It might make your car fail emissions tests and hurt the environment.
Fuel efficiency reduction
If the O2 sensor is not connected, the engine control unit (ECU) will use an air/fuel ratio that is not optimal for fuel economy. As a result of the incorrect ignition timing, your engine will operate inefficiently and consume more fuel than necessary.
Misfires, engine stalling, and reduced performance are problems that can come from a vibrant air/fuel ratio.
Defective catalytic converter
The harmful particles removed from the exhaust by the catalytic converter, thanks to the ineffective air/fuel combination, may cause damage.
Check-engine indicator
Disconnecting an O2 sensor while moving may illuminate the check engine light. It indicates that there is a problem with the emissions control system.
How to delete O2 sensors from ECM?
Remove an O2 sensor from the engine control module (ECM) by modifying the vehicle’s engine management software. You require specialist tuning hardware or software to do this. That can alter the sensor parameters by accessing the ECM’s programming.
It’s crucial to remember that changing the engine management software can impair your car’s performance and emissions. In addition to increased emissions and poorer fuel efficiency, removing the O2 sensor may trigger the check engine light or other diagnostic fault codes.
How long can I drive without an oxygen sensor? What Happens If I Unplug My O2 Sensor?
Though it’s not good to drive with a faulty O2 sensor, you can use a defective oxygen sensor if your engine starts, and you can go. Please don’t leave it unattended for more than a few days since this could risk vehicle safety and damage other parts.
A disconnected O2 sensor makes emissions testing unlikely. A vehicle’s emission control system relies on the O2 sensor to measure exhaust gas oxygen. The engine’s ECU uses this data to fine-tune the air/fuel mixture for maximum efficiency in combustion and minimal exhaust fumes.
The ECU may only get reliable values if the O2 sensor is plugged in or fixed. Discharge gas testing may fail due to the ECU storing a fault code, lighting the check engine light, or both. Unplugging the O2 sensor can enrich the engine, reducing fuel economy, performance, and gas emissions.
So fix it if it malfunctions over time.
What Happens If I Unplug My O2 Sensor which is Downstream?
What Happens If I Unplug My O2 Sensor? Well Various things can happen. After installing the catalytic converter, vehicles need a downstream oxygen (O2) sensor to check exhaust gases. The exhaust oxygen sensor shows how successfully the catalytic converter reduces polluting emissions. Your vehicle’s performance, efficiency, and emissions may suffer if you remove your downstream O2 sensor.
Read more to learn what will happen if you remove the downstream O2 sensor.
Using more fuel
The O2 sensor downstream informs the engine control module (ECM) of the exhaust gas air-fuel ratio. The ECM optimizes engine performance and emissions by adjusting ignition and fuel injection timing.
Disconnecting the downstream O2 sensor may cause the ECM to default to a fuel-rich mixture. A rich fuel mixture can increase fuel consumption since the engine uses more fuel to maintain power output.
Low Engine Efficiency
Its downstream O2 sensor can detect catalytic converter and emissions control system faults. When the O2 sensor detects a problem, it lights the dashboard “Check Engine” light and stores a DTC in the ECM.
If you remove the downstream O2 sensor, the ECM cannot test the catalytic converter and may assume everything is fine. It could reduce engine power, acceleration, and response time.
Emissions Failure
Many states require annual emissions testing for cars. The emissions test examines CO, HC, and NOx in exhaust gases.
If you remove your downstream O2 sensor, your car may exhaust more pollutants than the law allows. It could cause your vehicle to fail the emissions test, necessitating costly repairs.
How Do I Fix an Unplugged Downstream Oxygen Sensor?
You already know what will happen if you unplug the downstream oxygen sensor. Now it’s time to learn the possible solutions.
Find the O2 sensor.
O2 sensors are generally on the exhaust pipe near the engine. You may find it in the owner’s manual or service instructions.
Connector check
Inspect the O2 sensor connector for damage or corrosion. You may need to repair the connector if you see damage or deterioration.
O2 sensor reconnect.
Reconnect the sensor if the connector is suitable. Make sure the connection is in the right place and is tight.
Fix errors
The ECM might store a trouble code if the O2 sensor was unplugged for a long time. It is possible to clear trouble codes using OBD-II scanners.
Drive the car around.
Test the O2 sensor by driving the car. Replace the O2 sensor if the check engine light returns or the vehicle fails discharge gas testing.
How To Fix Broken O2 Sensor?
Usually, people who are serious about improving their car’s performance remove the oxygen sensor. It is common for O2 sensors to detect too many pollutants and leftover fuel after installing performance parts like exhaust headers or nitrous oxide. The readings could cause the ECU to inject less fuel, inhibiting performance gains. As a result, the check engine light will also illuminate when the O2 sensor malfunctions.
It’s good to hear that the performance went well. Nevertheless, O2 sensors are included for an optimal ride for average people – good performance, good fuel economy, and low emissions. A car’s ECU can no longer calculate fuel injection amounts when the O2 sensor is removed. As a result, the ECU will fallback to its default value and inject the same amount of fuel every time. There is a possibility of either low performance or horrible fuel economy as a result.
When You May Need To Unplug The O2 Sensor?
Testing the O2 sensor
Test the voltage and resistance of your O2 sensor with a digital multimeter if you suspect it is malfunctioning. This type of work should only be performed by qualified mechanics with the appropriate equipment and expertise.
Welding near the exhaust system
To avoid damage to the O2 sensor from heat or sparks when welding near the exhaust system of your vehicle, disconnect the sensor before welding.
Engine tuning
When tuning the engine for maximum performance, the O2 sensor may need to be temporarily disconnected. Tuners who are experienced in manual air-fuel mixture adjustment should only do this.
What are the Precautions When Unplugging O2 Sensor?
Unplugging the oxygen (O2) sensor on your vehicle can damage the sensor, other components, or you. To keep in mind, keep the following in mind:
To prevent burns from hot exhaust components, ensure the engine is turned off and cooled down.
Work on your vehicle’s exhaust system while wearing appropriate protective gear, such as heat-resistant gloves and eye protection.
The most common O2 sensors have a threaded connector that can be removed with a wrench or socket. Ensure that the connector and sensor are not damaged.
Keep the wiring and connector in good condition: Do not damage them. There is often a fragility to the wiring and it can be easily damaged.
Store the O2 sensor safely once you have unplugged it: Make sure the O2 sensor is stored in a location where it will not be damaged or lost. We ask that you keep it clean and free of dirt, dust, and other contaminants.
Make sure the sensor is properly connected: When it’s time to reconnect the oxygen sensor, ensure it’s done correctly so that the wiring and the sensor are not damaged. Ensure that you use the correct torque specifications and thread sealant if necessary.
Can You Just Unplug My O2 Sensor?
The oxygen sensor can be unplugged, but it is not recommended.
Fuel economy can be decreased, emissions can increase, engine damage can occur, and performance can be affected if the O2 sensor is unplugged.
It is possible to trigger an engine control module (ECM) fault code by unplugging the O2, which will turn on your dashboard’s “check engine” light. Depending on your location, you may not be able to pass emissions testing if your vehicle has a problem.
Can You Pass Emissions with an Unplugged Oxygen Sensor?
When the O2 sensor is disconnected, a vehicle is unlikely to pass emissions testing. Oxygen in exhaust gases is measured by an oxygen sensor, which is an essential part of an emission control system in a vehicle. In order to maintain optimum combustion and reduce discharge gases, the engine control unit uses this information to adjust the fuel-to-air ratio.
It is possible for the ECU to receive inaccurate readings if the O2 sensor is disconnected or malfunctioning. When this happens, a fault code is set and the check light is activated, and the vehicle may fail discharge gas testing. Unplugged O2 sensors may also cause the engine to run rich, resulting in poor fuel economy, reduced performance, and more nitrogen oxide and hydrocarbon emissions.
The key to passing discharge gas testing is ensuring that all components of the vehicle’s discharge gas control system function properly. Before attempting to pass discharge gas testing, the lambda sensor should be replaced or repaired if it is disconnected or malfunctioning.
Final Thought: What Happens If I Unplug My O2 Sensor!
Finally, you know all the ins and out of the question, “What happens if I unplug my O2 sensor?” Taking out your car’s O2 sensor could significantly affect its performance, economy, emissions, etc. Disconnecting or turning off any part of your car’s pollution control system is not a good idea, as it could do more harm than good.
But if your O2 sensor is broken or has a problem, you should have it checked out and fixed by a trained mechanic. & ensure the car runs well and doesn’t break any rules about pollution.
Do you love driving down the road, shifting gears like a pro? If so, have you ever experienced the frustration of not knowing what gear you’re in & What Fuse Controls The Gear Shift Light? Well, it’s a common problem that many drivers face.
It is possible, however, that the driver may not know which gear they are in if the gear shift indicator light does not work, leaving them gloaming.
One of the most common reasons for the gear shift indicator light not working is a problem with the fuses. Specifically, fuses 26 and 31—located in the fuse box on the driver’s side dashboard—control the gear shift light. So if either of these fuses has blown, it could result in your indicator light ceasing to operate altogether.
But the gear shift indicator light may not be working for various reasons. In this article, we’ll discuss some potential causes of the problem.
What Is a Gear Shift Light?
Even if it’s a minor device, it makes driving and shifting gears much easier. Essentially, the shift light is an indicator to let you know when it’s time to change gears without taking your eyes off the road.
Drivers can use shift lights to determine when to change gears without glancing at the tachometer. Instead of constantly glancing down at the tachometer to see if you’re in the right RPM range for a gear change, you can watch for the shift light to come on.
It might not seem like much, but every second counts when you push your car to its limits! It makes driving more convenient and safer since your focus remains on the track or road ahead.
How Gear Shift Light Work?
There is a fuse that controls the gear shift light on your vehicle. The light is activated when the key is turned to the ON position and power flows through the fuse. After turning off the ignition or putting the car in reverse, the light will remain illuminated. As a result, the driver is able to remember what gear he or she is in at all times. Additionally, it prevents the transmission from being damaged by accidental gear shifts.
Replace a blown fuse by replacing it with an identical one of equal amperage rating under your dashboard. To ensure that fuses work correctly, all electrical connections must be properly connected before they are replaced. In addition, you should always check the fuse before taking your car to the shop if you notice a problem with the shifter light.
In the event that a fuse does not appear to be the problem, then there may be an issue with the wiring somewhere along the line. A qualified mechanic should be consulted in this situation to inspect and diagnose any potential electrical issues your vehicle may have. In addition to helping ensure that your gear shift light works properly, these precautions can help prevent expensive repairs in the future.
By replacing a blown fuse and making sure all electrical connections are secure, you can ensure that your gear shift light continues to function correctly. Using incompatible items when replacing fuses could further damage your vehicle. Follow manufacturer’s instructions when replacing fuses. A professional mechanic can assist you in replacing the fuse if you are not sure how to do it.
Why Is the Gear Shift Light Important?
Maybe you’re thinking, What’s the use of a simple little gear light? & you know which gear you’re in by feel!
Well, it’s common knowledge that safety should always be a top priority while driving. And one of the most important aspects of staying safe on the road is ensuring you’re in complete control of your vehicle at all times. That’s where the gear shift light comes into play.
It may be necessary to rely on your instincts sometimes. Sometimes, it can be hard to tell which gear you’re in, especially if you’re driving a vehicle you’re not used to.
It’s a quick and easy way to double-check which gear you’re in, no matter the conditions. Not only does it help you avoid potentially dangerous situations, but it also makes driving more comfortable and less stressful.
Why Shift Indicator Light Stays On?
It is possible that a faulty switch is the cause of the shift indicator light staying on. Over time, the switch that controls the shift indicator light may become damaged or worn, causing it to malfunction. It would be necessary to replace the switch in this case in order for the indicator light to function correctly.
Perhaps there is a problem with the electrical system. There may be a problem with the wiring or electrical system that controls the shift indicator light, which may remain on even when the vehicle is in the correct gear.
If you are experiencing this problem, you should have your electrical system inspected by a qualified mechanic.
There is a possibility that the shift indicator light will stay on if the transmission malfunctions. A malfunctioning transmission or other issues may prevent the transmission from communicating the correct gear information to the shift indicator light. This issue would require repairing or replacing the transmission.
What are the reasons the Gear Shift Light Stop Working?
The gear shift light can sometimes stop working properly. Knowing what could be causing this problem can help you figure out what’s wrong and fix it.
Here are some of the most common reasons why the gear shift light may not work.
- Electronic Control Unit Issues
- Wiring problems
- Disengaged Connection
- Misalignment
- Malfunctioning shift indicator module
Electronic Control Unit Issues
The ECU, also known as the engine control unit, is an essential component of a car’s electrical system that oversees various functions, such as fuel injection and ignition timing. A malfunction or programming error in the ECU can result in an array of problems, including issues with the gear shift light.
When this happens, it’s important to get professional help from specialized diagnostic tools to figure out what’s wrong with the ECU and fix it. If you don’t take care of these things, it could lead to bigger problems.
Wiring problems
Wiring problems or bad connections are another common reason the gear shift warning light might not work.
Over time, the wiring that ties the light to the car’s electrical system may get broken or loose, causing the light to stop working.
It stops the power from going to the gear shift light so it won’t light up.
Also, the shift indicator bulbs in the panel may burn out, which can also stop the light from working.
Disengaged Connection
If the gear shift warning light works when the headlights are on, then the light is probably working correctly.
But if the light still doesn’t work, the shift indicator wire or the light may be broken due to a disengaged connection.
If the wire isn’t connected to the light well, the light might not work. It can stop the flow of electricity to the light, making it stop working.
Also, worn or broken wires can cause a short circuit, making the light stop working.
Misalignment
When the gear shift warning light isn’t working right, it may be because something isn’t lined up right.
Misalignment of the gear can make the gear indicator show the wrong or no gear. Most of the time, a mechanic can fix this problem by adjusting the indicator’s position and ensuring it works properly.
Malfunctioning shift indicator module
The gear shift light problem may sometimes be attributed to a malfunctioning shift indicator module because the shift indicator module controls the gear shift light and displays the correct gear position.
If the module develops a fault, it may fail to send the necessary signals to illuminate the gear shift light.
Diagnosing, repairing, or replacing the faulty shift indicator module may be required to restore the gear shift light’s functionality.
What are the Indicator of Gear Shift Light Not Working?
Check Engine Light Comes On
The first thing you should do if you notice a problem with your gear shift light is to check the fuse that controls it. A blown fuse will prevent the light from working. There may be another problem underlying the fuse if the light isn’t turning on even when the fuse is still in good condition. During the course of time, the wiring between the switch and bulb could have corroded or damaged.
Wrong Gear Reading
There is also the possibility that the car is not reading the right gear when there is a malfunctioning gear shift light. In automatic transmissions, the gear shift light will need to be manually calibrated in order to work properly. In the event that you recently installed a new transmission, then there may have been a problem during installation and the light is still on.
Shift Indicator Does Not Move
It’s possible that something is wrong with the linkage between the gear shifter and transmission if your gear shift indicator does not move when you shift gears. Keeping your gear shift light off could also be a result of this problem.
Once you’ve ruled out all of these causes, it’s recommended that you have your car looked at by a professional mechanic. In this case, your mechanic can diagnose the issue and recommend a course of action to restore your gear shift light to working order.
What Can You Do to Fix Your Gear Shift Light?
The gear shift light is an essential component of your vehicle that indicates the current gear selection. It can be frustrating and potentially unsafe when it malfunctions and fails to illuminate well.
Follow the steps to troubleshoot and fix the issue with your gear shift light. Here are some effective methods to consider:
- Start by checking the fuse related to the gear shift light and replacing it if it’s blown.
- Inspect the bulb for any signs of damage and replace it if necessary.
- Examine the wiring harness for loose connections or damage.
- If these steps don’t fix the problem, it’s best to call a professional mechanic who can figure out what’s wrong and fix it.
What are the Changing Process Of A Gearbox Light?
Vehicles’ gear shift lights alert the driver when it’s time to change gears by indicating when it’s time to shift. The system must, however, be connected to an appropriate fuse if it is to function properly. In other words, it determines how bright or dim the gear shift light should be based on the power flow from the battery or another source of electricity. The gear shift light fuse needs to be located and identified in order to be replaced or repaired.
Your car’s make and model can affect the process for finding and replacing a fuse related to its gear shift light. When it comes to identifying your light’s fuse, there are two general approaches. To find the correct fuse, you should first consult the owner’s manual, which should contain diagrams and schematics. You can also consult with a trusted mechanic or car technician, who will be able to identify and replace the fuse if needed.
Final Thought: What Fuse Controls The Gear Shift Light?
We know that fuses 26 and 31 control the gear shift light in the driver’s side dashboard fuse box. However, in most cases, this fuse is located within the interior fuse box and labeled as an “instrument panel” or “cluster.” It’s important to note that if this fuse blows out, your gear shift light will cease functioning correctly, and other dashboard lights may also be affected.
FAQs
What’s the process of a gear shift indicator?
The gear shift sign on the driver’s display tells you what gear you are in and when you should change to the next gear to get the best gas mileage. When changing gears manually, you need the right tools to switch gears for eco-driving sensibly.
What is a sign of shifting?
The shift or gearshift sign is a display that tells you what gear your transmission is in.
How do automated cars’ gear shift indicators work?
The gear shift sign tells the driver when to switch to the next higher or lower gear to use the minor gas. It is essential to drive in the right gear and change gears early enough to drive in a good way for the environment.
How does one operate the gear shifter?
A gear shift control system that feeds a microcomputer to transmission output speed and gear position signals.
How can I understand if my shift monitor isn’t working?
When you can’t get your car out of neutral or park, it’s a clear sign of a significant problem with the shifting system. If the transmission position sensor is broken, it might not send the Powertrain Control Module (PCM) the right signals.
A blown radiator hose can be an annoying and inconvenient issue for car owners. Therefore, you might be wondering what causes radiator hose to pop off.
The radiator hose, however, may occasionally keep blowing off for various reasons. Overheating and possible engine damage result from this issue for the car.
It’s rather typical and, in some circumstances, could have been prevented! So let’s have a look at the most common reasons and solutions that might answer the question of what causes the radiator hose to pop off!
What are Radiator Hoses?
Radiator hoses convey engine coolant to and from the radiator. The upper hose carries hot coolant from the engine to the radiator. The lower hose carries the cooled fluid back to the water pump and then back into the engine. The water pump circulates this coolant continuously while the engine is running.
These hoses designed to remain flexible across a temperature range from about -30 degrees to 250 degrees F. High-performance hoses can provide an even broader temperature capability for racing applications.
Hose construction typically includes a layer of aramid, polyester, or Nomex fibers to help the hose endure pressure. Hoses on today’s cars can last well over 100,000 miles, sometimes exceeding twice that value.
What Happens When a Radiator Hose Blows?
The radiator hose, which transports coolants from the radiator to the engine, is a crucial component of the radiator. The coolant flow from the radiator to the engine is interrupted when the radiator hose bursts. If the issue not thoroughly investigated, it may cause damage to various engine components and ultimately result in engine failure.
Moreover, leakage is another sign of a blown hose. A coolant leakage on the ground will be visible, which prevents coolants from reaching the engine, causing heat to build up.
Checking Your Radiator Hoses
The condition of your radiator hoses checked every time you change your oil. This can only be done after the engine has been turned off and cooled. When the engine is running, do not inspect the hoses with your hands; this poses a severe injury risk.
What Causes Radiator Hose to Pop Off:
what causes radiator hose to pop off? 8 Common Reasons!
Broken Coolant Hose Clamp
Hose clamps rarely become loose for no apparent reason. If they are loose, the hose will pop off when hot water starts flowing through it and pressure builds up in the cooling system.
Head Gasket Malfunction
The head gasket is a part that fits within the engine block and the cylinder head and seals the combustion chambers to prevent coolant, oil, and exhaust gases from combining with one another. A failed head gasket causes the radiator hose to rupture.
Damaged radiator cap
The cap sends coolant and additional pressure back to the reservoir when the internal cooling system pressure exceeds its threshold. A radiator hose could pop off if the cap doesn’t work properly because of higher pressure levels.
Damaged Coolant Hose
If the hose material deteriorates, it loses its capacity to retain its shape and elasticity or splits and degrades over time; as a result, the hose is unable to maintain a tight seal and may pop off.
Expansion Tank Hose Blockage
When there is a blockage, the air cannot return to the expansion tank, creating a vacuum similar to what happens when the radiator pressure cap breaks. This vacuum can lead to a hose collapsing or even popping off when the pressure builds up too high.
Radiator Blocked Problem
Pressure builds up within the cooling system as a result of the restricted coolant flow that results from blocked radiators. The radiator hose may pop off its fittings and become disconnected from them if the pressure is too much for it to handle.
Excess Fluid
Due to pressure buildup, overfilling the cooling system may result in a damaged radiator hose. Leaks that let air into the system and poorly controlled coolant levels can both cause this.
Water pump Malfunction
The coolant pumped by the water pump via the radiator and around the engine. The cooling system may experience isolated areas of high pressure due to insufficient coolant flow, which may result in a radiator hose rupturing.
What Are The Symptoms of A Radiator Hose Blowing Off
The following signs of a blowing radiator hose may point to its causes:
- Any obvious hose leaks, tears, or cracks.
- The radiator’s or coolant reservoir’s coolant levels have dropped.
- Higher than usual readings on the engine temperature gauge.
- From the engine area, a burning stench is coming.
- Spilling or leaking coolant.
- In the coolant is rust or particles.
- The hose connections are faulty or leaky.
- Poorly positioned or aligned hoses.
- Stalling or lowered engine performance.
- The engine compartment issues steam or smoke.
- Uncommon engine noises.
- Higher than usual readings on the engine temperature gauge.
- Stalling or a reduction in engine power.
Can a Collapsed Radiator Hose Cause Overheating?
There is a possibility that an overheated hose may collapsed. The flow of coolant will be restricted if a hose goes flat while you are driving. The instrument panel will display an overheating warning light and/or an elevated temperature indication.
The engine must shut off as soon as possible by pulling over to the side of the road. When an engine is overheated, it can suffer severe damage if it is driven.
Apart from a collapsed hose, several other causes can contribute to engine overheating problems.
8 Simple Steps to Repair Your Blown-Off Radiator Hose
Before you can drive your car again, your radiator hose needs to be fixed or replaced if it has blown off. The following are the procedures to fix a blown-off radiator hose:
- Please shut off the vehicle and allow it to cool. You won’t risk burning yourself on any hot components if you do this.
- Find the radiator hose that was blown off. Usually, it will be close to the engine and radiator.
- Look for any splits, cracks, or other damage in the hose. The hose must be changed if it is damaged. Use a rubber patch kit to temporarily repair the hose if the damage is small.
- To get rid of any dirt or debris, wipe the area around the hose with a towel. This will guarantee effective adhesion of the replacement hose or patch.
- Put the hose or patch back on. If the hose has to be replaced, slide it onto the fittings and tighten the clamps. Apply the rubber patch to the damaged section of the hose and secure it with hose clamps if you’re patching it.
- Add coolant to the radiator once more. For information on the right kind of coolant to use and how much to add, consult your owner’s manual.
- Run the engine for a few minutes after starting it. Examine the area around the repaired hose for any leaks. As long as there are no water leaks, everything should be fine. If there are leaks, the clamps might need to be tightened or the hose could need to be changed.
- An urgent solution is needed for a blown-off radiator hose because it is a serious issue. The engine could suffer catastrophic failure if you keep going while the hose is blown off. If you aren’t confident fixing the hose yourself, you should have a qualified expert do it.
Should Both Radiator Hoses Be Hot? What causes radiator hose to pop off!
When the upper hose is carrying coolant directly from the engine, it will become quite hot after just five miles of driving. The bottom hose, which conveys coolant back to the engine, will be warm to the touch if the radiator is functioning.
If, after the engine has warmed up, the lower hose is cold to the touch, you most likely have a problem.
How often should you change your radiator hose?
In order for the radiator to transfer coolant to these components while allowing the engine to run optimally, the radiator hose connecting the radiator to the thermostat housing and from the radiator to the water pump is usually made of soft rubber. These hoses will eventually wear out due to elements found in the engine bay, antifreeze chemicals, and exposure to cooling and heating cycles.
It is usually not specified when to change these hoses by auto manufacturers. By visual inspection, you can tell when they need to be replaced. It is possible to do this by squeezing the hoses. In order for the hose to spring back when depressed, it should be firm. Whenever the hose springs back slowly or feels spongy, it indicates that it needs to be replaced. The hoses should also inspected for cracks and fraying on both ends. Check the clamps holding the hose for swelling and cracks.
How To Replace A Radiator Hose?
The replacement of a radiator hose can completed in just a few hours. You need to follow these steps:
- Be sure to set the parking brake and park in a safe place.
- Remove the hood from your car and locate the radiator.
- Use a crescent wrench to loosen the clamp on the radiator hose that needs to be replaced.
- Dispose of the old radiator hose carefully.
- Seal the new radiator hose with radiator sealant.
- Carefully insert the new radiator hose into the clamp and tighten it with the crescent wrench.
- Allow the radiator sealant to dry by closing your car’s hood and starting it up.
- Make sure the new radiator hose is properly seated by driving your car a few miles.
Be sure to follow these steps carefully when replacing a radiator hose. The radiator hose can be easily replaced if you follow the instructions carefully.
What is the Replacement Cost of Radiator Hose?
It is better to be safe than sorry when it comes to replacing radiator hoses. You should replace your hoses immediately if you experience any problems. You will be able to maintain the safety and efficiency of your vehicle by doing this.
Around $250 is the average cost of replacing a radiator hose. You can expect this price to vary depending on the type of hoses you need and the model of your vehicle.
The cost of this repair can be affected by a few factors, such as the amount of labor required and the availability of parts. Whenever you need a radiator hose replaced, consult a trusted mechanic for an estimate.
Should a radiator hose be hard when hot?
It is important to have a firm radiator hose when running a hot engine (not too hard). Because of the engine block’s high pressure, hot water flows through the radiator hoses. The radiator cap spring releases the high pressure at this point, allowing the hot water to return to the reservoir tank. When the engine is hot, you will get scalded if you open the radiator. When the engine is hot, avoid opening the radiator cap.
Should You be Able to Squeeze the Radiator Hoses?
Yes, you should be able to squeeze the hoses once the engine has been turned off and cooled down. It is important that hoses are flexible, but they should not feel squishy or spongy when pressed with your finger. Brittle and hard hoses will age.
It is important that both hoses have a uniform diameter without bulges or cracks that can be observed. Replace brittle, bulging, or cracked hoses immediately if they are squishy, brittle, or brittle.
Warning:
Old hoses exhibiting the above symptoms may spontaneously rupture. When examining a hot engine with the engine off, hose failure can cause severe burns or blinding if coolant sprays onto you.
Quick Fixes You Can Do for the Blown Radiator Hose
If you are not comfortable repairing your car or are looking for a quick fix before replacing the hose, you might find this article useful. If you need a temporary fix, try insulating tape instead.
An auto repair shop or gas station can provide you with insulating tape. You will be good to go once you wrap the tape tightly around the leak.
As an alternative, you can use duct tape if you have it.
Your mechanic will need to replace the hose in either case as soon as possible, as it won’t last that long.
Can You Drive with A Blown Radiator Hose?
There is no reason for you to do so. You have already heard that your vehicle’s cooling system is primarily composed of a radiator. Driving a car with a coolant leak due to a blown radiator hose will only allow you to do so for a short period of time.
The water pump will start sucking air once the coolant has been drained completely. Your engine will overheat quickly and internal parts of your car will suffer extensive damage as a result.
6 Effective Tips: what causes radiator hose to pop off!
Here are six preventive measures to avoid the radiator hose blowing off:
- Regular Maintenance: As part of the scheduled preventive maintenance for your car, check and replace the radiator hoses.
- Replace Worn-Out Hoses: Any hoses that are old or worn out should be replaced before they become a potential source of trouble
- Check Coolant Levels: Regularly check the coolant level and, if necessary, add more.
- Use The Right Type Of Coolant: Always use the particular type of coolant that the manufacturer recommends
- Check For Physical Damage: Check the hose frequently for any indications of physical wear and tear, such as cracks or rips, and replace it if necessary.
- Avoid Overheating: Avoiding driving your automobile while the interior temperature is too high would be beneficial as doing so could injure the hoses and other parts.
Conclusion: what causes radiator hose to pop off!
You might now got an idea of what causes radiator hose to pop off. In conclusion, blown radiator hoses are a serious problem for car owners. The main causes of blown radiator hoses include old or worn-out hoses, overheating, excessive fluid, contaminated coolant, faulty installation, physical damage, defective radiator caps, clogged radiators, and broken thermostats.
Radiator hose blowouts are avoided with regular cooling system maintenance and inspection. Problems can be avoided by checking the coolant level, cleaning the radiator, and replacing the hoses. Quickly address overheating issues to prevent damage to the cooling system and engine.
FAQs
My radiator hose popped off; why?
An enormous buildup of pressure within the cooling system is the most frequent reason for a radiator hose to suddenly pop off. This can happen for a number of different causes, such as a broken radiator cap, a clogged or constrained radiator, a broken thermostat, or a blown head gasket.
Can an old radiator hose come loose?
Yes, radiator hoses can weaken and degrade with time, which increases the likelihood that they will rupture. The hose material may degrade, split, or become brittle with age, increasing the likelihood that it will rupture under pressure.
What part does coolant play in the failure of radiator hoses?
Antifreeze, sometimes referred to as coolant, is an essential component of the cooling system. Coolant contamination, aging, or insufficiency can cause overheating, which puts an excessive amount of strain on the radiator hose.
Can radiator hoses come off due to incorrect installation?
Yes, radiator hoses can pop off due to incorrect installation. A weak connection that could rupture under pressure can be made if the hose clamps are not tightly fastened or the hose is not positioned correctly in relation to the connection locations.
Do radiator hose pop-offs have a way to be prevented?
You can take a number of preventative actions, yes. Check the condition of your radiator hoses on a regular basis for wear, cracks, or leaks. Make sure the quality and level of the coolant are suitable for your car.
Whether you’re a passionate automotive enthusiast or a dedicated gear head, these meticulously crafted components are designed to make a bold statement under your hood. Ignite your passion for automotive excellence with 5.9 Magnum Valve Covers & Accessories.
The 5.9 Magnum Valve Covers & Accessories are a range of high-quality components designed specifically for the 5.9-liter Magnum V8 engine. It’s meticulously crafted from high-grade die-cast aluminum and proudly made in the USA.
They designed specifically for 5.2L/5.9L Magnum V8 engines, ensuring seamless compatibility with 1992-Up. With an exterior measurement of 3-1/2 inches and an interior diameter of 3-1/8 inches, these valve covers provide an ideal fit for your engine. Equipped with oil baffles for improved lubrication and included grommets for hassle-free installation, these valve covers are ready to elevate your engine’s performance and appearance.
Experience the precision, quality, and reliability of the 5.9 Magnum Valve Covers, the perfect choice for enthusiasts seeking top-notch components for their Magnum V8 engines.
Explore this article to learn more.
What are the Specifications Of 5.9 Magnum Valve Covers?
- Material: High-grade die-cast aluminum
- Engine Fit: 1992-Up, 5.2L/5.9L Magnum V8
- Exterior Diameter: 3-1/2 inches
- Interior Diameter: 3-1/8 inches
- Oil Baffles: Installed
- Grommets: Included
- Part Number: 110-6025
- Fit Type: Vehicle Specific
These valve covers built to last with their high-grade die-cast aluminum construction. They designed to fit 1992-Up 5.2L/5.9L Magnum V8 engines perfectly. The exterior diameter measures 3-1/2 inches, while the interior is 3-1/8 inches.
Oil baffles pre-installed to ensure proper lubrication, and grommets are included for convenient installation. The specific part number for these valves covers 110-6025, and they designed as a vehicle-specific fit to ensure compatibility and optimal performance.
What are the Notable Features Of 5.9 Magnum Valve Covers?
The Magnum Valve Covers boast several notable features that make them stand out as exceptional components for your engine:
Precision Fit
These valve covers designed to fit the 5.9-liter Magnum V8 engine perfectly. The precise fit ensures a proper seal and helps prevent leaks, allowing your engine to operate at its best.
High-Quality Materials
The valve covers constructed from premium materials that are built to last. They engineered to withstand high temperatures and resist
corrosion, ensuring longevity and durability even under demanding conditions.
Sleek Design
The Magnum Valve Covers feature a sleek and stylish design that adds a touch of visual appeal to your engine bay. With their polished finishes, these valve covers enhance the overall aesthetics of your engine and make it stand out from the crowd.
Easy Installation
These valve covers designed for easy installation, minimizing the time and effort required to replace or upgrade your existing valve covers. Many are direct replacements for the original parts, making the installation process straightforward and convenient.
Enhances Engine Performance
While providing an improved visual appearance, the Magnum Valve Covers also offer performance benefits. They designed to optimize crankcase ventilation, reducing the chances of oil leaks and improving overall engine efficiency. This valve covers contribute to increased horsepower and torque by ensuring proper airflow and reducing internal restrictions.
Compatibility
The Magnum Valve Covers designed explicitly for the 5.9-liter Magnum V8 engine. They engineered to meet or exceed OEM standards, ensuring compatibility and seamless integration with your engine.
Reliable Sealing
The valve covers designed to provide reliable sealing, preventing oil leaks and maintaining proper lubrication within the engine. It helps protect critical engine components and ensures optimal performance.
Overall, the Magnum Valve Covers offer a combination of style, performance, and reliability. With their precise fit, durable construction, and enhanced aesthetics, these valve covers are an excellent choice for anyone upgrading their 5.9-liter Magnum V8 engine.
What Are The Pros & Cons Of 5.9 Magnum Valve Covers?
The 5.9 Magnum Valve Covers offer several advantages, but it’s important to consider potential drawbacks. Here are the pros and cons of the 5.9 Magnum Valve Covers:
Pros of 5.9 Magnum Valve Covers
- These valve covers have a sleek design and add a visually appealing touch to your engine bay.
- Ensures a precise fit and proper sealing.
- With their die-cast aluminum construction, these valve covers built to resist corrosion and withstand high temperatures.
- The included oil baffles help improve lubrication and reduce the chances of oil leaks, contributing to better engine performance and protection.
- With pre-installed oil baffles and included grommets, these valve covers have easy installation, saving you time and effort.
Cons of 5.9 Magnum Valve Covers
- They may not be compatible with other engine types or vehicle models.
- Some individuals may prefer a different style or finish.
What Are the Best 5.9 Magnum Valve Covers & Accessories?
Mopar Performance Cast Aluminum Valve Covers
Mopar, a trusted brand in the automotive industry, manufactures 5.9 Magnum valve covers. They are made of cast aluminum for durability and feature a clean, classic design. Mopar Performance valve covers actually famous for their precise fit and excellent sealing properties.
Edelbrock Elite II Valve Covers
Edelbrock renowned for its high-performance products, and the Elite II valve covers are no exception. These covers feature a unique design, a black powder coat finish, and a raised Edelbrock logo. They constructed from die-cast aluminum and provide excellent durability and oil control.
Holley Sniper Fabricated Valve Covers
Holley Sniper valve covers designed for enthusiasts seeking a modern and aggressive look. This fabricated aluminum valve covers feature a sleek design with a brushed finish and laser-etched Sniper logo. They offer excellent sealing and fitment, making them popular for performance applications.
Billet Specialties Valve Covers
Billet Specialties offers a range of valve covers with stunning aesthetics and exceptional craftsmanship. These valve covers machined from billet aluminum and are available in various finishes, including polished, black, and brushed. They provide excellent sealing and add a custom touch to any engine bay.
Spectre Performance Valve Cover Set
Spectre Performance offers affordable yet reliable valve covers for the 5.9 Magnum engine. These chrome-plated steel covers provide a classic, shiny appearance while maintaining a secure seal. They are a popular choice for budget-conscious enthusiasts.
What to Consider Before Buying 5.9 Magnum Valve Covers?
Before buying 5.9 Magnum valve covers, it’s essential to consider the following factors:
Compatibility
Ensure that the valve covers designed explicitly for 5.9 Magnum engines. Check the product description, fitment details, and compatibility with your vehicle’s year, make, and model to ensure a proper fit.
Material Quality
Look for valve covers made from high-quality materials such as die-cast or billet aluminum. High-grade materials ensure durability, resistance to heat and corrosion, and long-lasting performance.
Design and Aesthetics
Consider the design and aesthetics of the valve covers. Decide if you prefer a sleek and modern look, a classic design, or a custom style that matches your taste and the overall theme of your engine bay.
Oil Control Features
Check if the valve covers have built-in oil baffles or other features that aid in oil control. Proper oil control helps prevent leaks, enhances engine performance, and maintains optimal lubrication.
Ease of Installation
Consider the ease of installation and whether the valve covers come with gaskets, bolts, or other necessary hardware. Valve covers designed explicitly as direct replacements can simplify the installation process.
Brand Reputation and Reviews
Research the reputation and customer reviews of the brand or manufacturer. Look for the positive feedback regarding their valve covers’ quality, fitment, and performance.
Budget
Determine your budget and compare prices among different valve cover options. Consider the value of material quality, design, and additional features.
Warranty and Customer Support
Check if the valve covers come with a warranty or guarantee. Additionally, consider the availability of customer support from the manufacturer if you have any questions or issues.
Final Thought
Elevate your engine bay to new heights and unleash the true potential of your 5.9 Magnum V8 with these exceptional components.
When choosing the best valve covers and accessories, consider material quality, durability, fitment, aesthetics, and budget.
Additionally, ensure compatibility with your specific engine model and personal preferences. Researching customer reviews and seeking expert advice can help you make an informed decision based on your needs and preferences.
FAQs
Can the valve cover make the engine overheat?
It is not a good idea to drive with a leaking valve cover seal because it can cause the engine to overheat, not work well, and suffer a lot of damage.
Do valve covers change how well a car runs?
Without an adequately sealed valve cover gasket, oil can spill down onto the engine’s valves and cylinders, causing damage. It can cause the engine to fail, making it run poorly. Most of the time, rough running occurs by a difference in the amount of air to fuel.
Does it matter if the valve covers are more extensive?
Unless the original valve cover fractured or damaged from the start, engine performance does not directly impact.
Can smoke come from a bad valve cover gasket?
One of the main reasons why oil leaks and makes white smoke is a valve cover that is split open. If you catch a bad valve cover seal early, it’s effortless to fix.
Do larger valves usually function better?
It depends on what kind of cylinder head the car has. Most of the time, bigger valves won’t improve air flow if the cylinder head is made for street use. Often, oversized valves will slow down the flow of air.
Installing a 2-Post Automotive Lift in your repair shop or home garage can help free up extra valuable space. This can massively boost the workshop’s efficiency and productivity. Automotive lift failure can be costly due to repairs and property damage. Car lift failure is dangerous that can cause a fatal accident or even death. If you wonder what a 2 Post Lift is and how to prevent and fix a 2-Post Lift concrete failure, then this article is for you.
Nearly every repair shop we encounter uses 2 or 4 post-car lifts. To suspend a vehicle above the mechanic to do repairs. As an auto repair enthusiast at home, you can place a car lift in your garage. The only thing you need to worry about is the suitable space for it.
Installing a 2-post car lift will give you a boost to maximize efficiency for your favorite home restoration.
Let’s learn more about 2-Post Lift, 2-Post Lift Concrete Failure, concrete requirements, and safety factors.
What is a 2-Post Automotive Lift?
A 2-Post Lift is an automotive hydraulic or hydraulic electric lift that raises heavy car parts or vehicles above the ground to allow mechanics or DIYers to work conveniently on the underside of vehicles.
The automotive charge is made up of two upright columns that have four adjustable arms that are attached to two hydraulic cylinders and a carriage assembly.
As opposed to the 4-Post lift, which is wheel engaging, the 2-Post lift is frame engaging. The 2-Post automotive lifts have two parts in the market: symmetric or asymmetric. It functions by using the hydraulic fluid that pushes the piston up to allow the platform to move up.
For the platform to move downwards, the valves in the lift have to open to allow the fluid to flow back to the reservoir through the gravitational force of the lift.
Apart from two-post and four-post automotive lifts, other types of lifts are:
- Portable auto lifts.
- Inground automotive lifts.
- Automotive scissor lifts.
- Parking lifts.
- Mobile column auto lifts
- Alignment auto lifts.
What’s the Best Car Lift for Your Garage?
A car lift for your garage can come in three main types based on the type of car you have:
- 4 post car lift
- 2 post car lift
- scissor car lift
Garage parking is not possible with scissor lifts because you cannot park underneath them. Their lifting capacity is also usually lower and they are better suited to hoisting vehicles temporarily rather than storing them for long periods of time.
Therefore, there are two main options for home car lifts: a 4 post lift and a 2 post lift. This article will simplify a few issues surrounding the debate between a 4 post car lift and a 2 post lift.
What are the Prerequisites for the installation of a 2-post lift?
Before installing a 2-Post lift, the following requirements must be met.
- In order to prevent the concrete from bursting under a load. The 2-post lifts with wide or large base plates are better than those with narrow base plates.
- Lifts should not be installed over surfaces other than concrete, such as asphalt. Furthermore, the concrete must meet the minimum compressive strength, thickness, reinforcement, and age requirements. Putting the lift over hand-mixed concrete is also unsafe.
- It is important that the concrete floor on which your lift is placed is level. The minimum concrete thickness recommended by some 2-Post lift manufacturers is 4 inches.
- Nevertheless, 6-12″ of flooring thickness is recommended as a safety precaution. A car lift’s weight should determine how thick the floor should be.
- The thickness of a concrete floor must be 4″ for a 2-post lift that weighs 8500-10000 pounds, and 6″ for a lift that weighs 12000-18000 pounds. To verify the concrete thickness of the floor, you can use a hammer drill. A floor concrete mix must also follow the manufacturer’s instructions.
How to install a 2-post car lift?
Firstly, glue the columns to the floor. In the next step, drilling will take place. This will generate a lot of dust and noise. If you’re sensitive to dust or noise, wear an earplug and a dust mask.
The lifting capacity of certain lifts determines the lift’s depth. Drill the main side column holes first, then the other one, using the existing holes in the base plate as a guide.
To make the holes, use a hammer drill. After clearing the hole, blow on it to remove any dust to improve holding power. Place the bolts in the holes, but don’t tighten them yet. Hammer the bolts until the washer rests against the base plate.
The Top Trough Assembly is next. A forklift is usually needed to raise the bar, but two ladders and two men on each side can also be used. Place the bolts on top and tighten them. Once the structure is in place, the hardest part of the lift will be done. Retighten the anchor bolts if they became loose while tightening the top bar.
The next step is to install the hydraulic power unit. Despite the hydraulic unit’s weight, you can install it with help. Usually, the unit comes with a vibration dampener, which needs to be installed between the hydraulic unit and the column. After installation, it will take approximately four gallons of hydraulic oil to fill the hydraulic unit.
How to Install a 2-post Lift on a poor SLAB?
Concrete slabs that aren’t up to par can still be made work. There are a few ways to safely accommodate the lift if the concrete is too thin or damaged or worn.
You will need additional tools and be prepared for extra work in this case. Make sure you dig a hole large enough to fit the lift’s columns. It should be at least a two-by-two-foot hole with a depth of 10 to 12 inches.
After pouring concrete into the holes, your 2-post lift is now secured to a working slab. With any new slab, you should follow concrete requirements so you know your workshop is safe.
How to Fix a 2-Post Lift Concrete Failure?
When your 2-post lift concrete fails, there are steps you can take to fix it or strengthen and stabilize it to prevent another failure in the future. Determine the cause of the damage.
When concrete fails, it could be because the floor surface the automotive lift is on does not meet the minimum requirements for automotive lift installation.
Poor installation or maintenance can also cause 2-Post Lift Concrete to fail. In the case of poor installation, you will require the services of an installation expert to prevent further damage to the concrete.
Determine the type of repair needed based on the severity of the concrete damage on the automotive lift. It is best to remove the 2-Post lift first if the damage is widespread. Specialized tools and proper planning are required for the removal.
Depending on the extent of the damage, repair the concrete floor. When a small hole exists in the floor, it can be patched up, but if the hole is widespread, it will require concrete to be repaired.
Using the help of an installation expert, you can reinstall the 2-post lift after repairing it. To enhance the support and stability of the automotive lift, you can also use a slab.
Test the lift to ensure it meets safety standards after the car lift repair is complete. To ensure the safe and proper operation of the lift, check the anchor bolt, alignment, and other parts.
What You Need to Avoid 2-Post Car Lift Failure?
Concrete floors are not the only reason for the car lift’s failure. You need to avoid these.
These are some of the reasons:
Faults in design that lead to failures.
- The car lift installation is incorrect.
- By using the lift’s adjustable arms incorrectly, the vehicle is not properly secured.
- It is necessary to fix substandard cheaper alternatives.
- The consequences of these errors can range from serious injuries to fatal accidents, deaths, and property damage. Preventing the failure of a 2-post automotive lift can be prevented by taking some precautions.
- During the process of lifting the car, evaluate the center of gravity of the car to determine whether it will shift to one side.
- If you need to remove heavy vehicle parts before raising the vehicle above ground, follow the instruction manual of the automotive lift.
- Prevent accidents by inspecting the lift’s chock devices before and during lifting.
- Whenever you notice that the car lift is not well secured or about to fall off, lower it.
- Make sure the lifting points and adapters are free of corrosion. Wet or oily surfaces can also lead to slip-and-fall accidents.
- Keep the lift’s maximum lifting capacity under control to avoid overloading it.
- When lowering an automotive lift, make sure there are no people or equipment in the way.
- On drive-on lifts, choke the wheels properly.Repairs should not be done with only rotary points on an automotive lift.
- Worker training is necessary to ensure the lift is used properly.
- Lift accessories such as lift adapters are manufactured according to automotive lift standards.
- Be careful not to override safety features.
- You should review the recommended lifting points where the automotive lift should contact the vehicle. To ensure the lifted vehicle will be stable, perform this visual check.
How to Prevent a 2-Post Lift Concrete Failure?
Before installing the lift, you should have the standard floor requirements set up. Two-post lifts also require proper maintenance after they are installed.
You need to do a proper concrete installation. Then adequate the concrete thickness. Use high-quality concrete.
When cracks around the lift’s anchor points, the lift’s posts sink, uneven lift operation, and excessive vibration happen immediately check. Take the necessary steps to prevent them.
2 Post Car Lift Safety
It is always imperative to keep safety in mind when installing heavy equipment, so before attempting to install a 2 post lift on your own, keep these things in mind:
Car lifts with two posts are dangerously heavy and should be treated carefully. To prevent injury, even upon initial delivery of the lift, a second person should assist you in lifting the parts. The best way to make this work is to make it a team effort.
Make sure you follow all directions and use the correct tools. Consult manuals for more information. Ensure you follow your lift’s manual to ensure you are following the correct requirements.
In case you find the project too challenging, you might want to consider hiring a professional automotive equipment installer. When problems arise during the process, you’ll know you’re in good hands.
You will be safe if you keep these things in mind when you attempt your own installation. The following are important considerations, but they are not the only ones. If you want your installation to be truly safe, you should follow the strict requirements for 2 post lift concrete.
2 Post Lift Concrete Requirements
In the first place, all types of car lifts must be installed on solid concrete surfaces only. Lifts should not be set up on damaged concrete, including cracks caused by expansion, without first repairing the slab. Finally, if a lift is going to be installed over the concrete, it should never be mixed by hand. Considering these factors is very important, since ignoring them can result in an auto lift failure that can cause serious injuries.
It is also necessary for the concrete slab to be at a specific depth so that a car lift can be safely installed. Reinforced concrete should be at least four inches, but ideally, it should be at least six inches, or even twelve inches. You should plan on installing a deeper slab, ranging from six to twelve inches deep, and with a PSI of at least 3,000 if you are going to lay a new slab before installing the lift.
What is the Difference Between Symmetrical and Asymmetrical 2-post Lifts?
By positioning a vehicle in the center, symmetric lifts balance its weight evenly from front to rear. The asymmetric lifts, on the other hand, allow you to open the doors more easily since the vehicle is positioned farther back on the lift. Additionally, some manufacturers rotate the columns at an angle of 30 degrees, which allows doors to open further.
Generally, automobiles are heavier at the front due to the location of their engines, and they balance out asymmetrically just fine. A vehicle with a rear engine, an extra-long crew cab dual truck, and a service van with a lot of equipment at the back balance out better when positioned symmetrically.
There is also the option of configuring the arms to be symmetrical on BendPak’s asymmetric 2 post lift. In this way, asymmetric models are truly unique and very versatile, since you can push a vehicle forward and make it symmetric if it doesn’t balance out well asymmetrically. The best of both worlds.
It is true that some manufacturers claim their floorplate lifts are asymmetrical, but they are not because the floorplate actually prevents the arms from going past halfway.
What Type of Drive System is Best for a 2-post Lift? (Chain, cable, or direct)
Comparing the different drive systems for a 2 post lift, direct drive is preferred, followed by chain, and then cable drive. Direct drive car lifts raise the carriage and arms directly by hydraulic cylinder, which makes them more efficient. You will be able to save money over the long-term life of the lift because fewer wear parts will be required, such as cables, pulleys, or chains. In addition to being safer than chain and cable drive lifts, direct drive lifts offer more control for the user, since if a cable or chain were to break during the lifting or lowering process, the drop would be controlled and gradual, rather than abrupt and fast. Two-post lifts with direct pull drives are cheaper, while two-post lifts with direct push cylinder drives are more expensive.
The chrome rod side of a direct pull lift is pressed to raise the cylinder. The chrome rod of the lift is exposed to the elements at all times, making it susceptible to scratches, dirt, dents, etc., when the lift is resting or fully lowered. Leaks will occur if the chrome rod becomes damaged. The most common problem with hydraulic cylinders is seal leakage. End cap wiper seals or U cups are typically the first to fail since they run over the chrome rod when returning back to the cylinder after being exposed.
To contain pressurized hydraulic fluid, direct pull cylinders also need both piston and rod seals. It is impossible to operate the cylinder if any one of these seals fails. Since BendPak two post lifts are push style, the fluid is only contained on the slave (back) side of the cylinder. In the case of a completely lowered cylinder rod, the rod is stored within the bore of the cylinder.
Conclusion
In conclusion, a 2-post lift is a valuable tool for automotive maintenance and repair facilities, particularly those with space limitations. It offers accessibility to the vehicle’s underside, cost-effectiveness, and flexibility. However, its usage requires careful attention to proper lifting points, consideration of the vehicle’s center of gravity, and diligent maintenance. When used correctly and maintained well, a 2-post lift can greatly enhance the efficiency and capabilities of a workshop or garage.
FAQs
How does 2-post lift concrete fail?
An automotive lift with two posts can cause concrete failure, which is structural damage. Improper concrete installation, inadequate concrete thickness, and poor concrete quality cause this problem.
When does concrete fail on a 2-post lift?
Concrete failure signs include cracks around the lift’s anchor points, the sinking of the lift’s posts, uneven lift operation, and excessive vibration.
Is it possible to repair a two-post lift concrete failure?
Yes. Repairing 2-post lift concrete failure is possible in most cases. Repair methods will depend on the damage and underlying cause.
When two-post lift concrete fails, how can it be repaired?
There are a lot of ways to fix a 2-post lift concrete failure. You can patch it or resurface it, inject epoxy to fill cracks, reinforce it with steel or fiber reinforcement, or in some cases, just get rid of it and replace it.
Do two-post lift concrete failures cost a lot of money to repair?
Concrete failure repair costs depend on the extent of damage, the repair method, local labor and material costs, and other factors like accessibility. Getting an accurate estimate requires multiple quotes from reputable contractors.
Have you ever accidentally shut your car door with a broken handle? It’s a common human error, and sometimes it’s hard to make it back in. So, if you’re new to this, how to open car door with broken handle from outside? This article is for you!
There’s nothing more annoying than having to struggle to open the car door when the handle has broken. Find the latch device inside your door. Find this close to the potential handle attachment point. Ensure you can see well by turning on a lamp or torch close.
Every person who likes to be outside should know how to open a car door with a broken handle from the outside.
So, in this post, we’ll show you a step-by-step process of how to open a car door with a broken handle. We’ll also discuss the necessary tools and give you some safety tips. Let’s dig in!
How A Car Door Works?
The mechanical assembly of a car door isn’t that difficult. The mechanism works in much the same way as a home door, with a few additional components.
The latch on the door will depress when you pull the handle. It is then possible to open the door. Upon closing, the latch extends, preventing the door from being opened. Moreover, a locking mechanism can be installed to prevent the latch from opening until you unlock the car door and open it.
Checking the switch for the door lock mechanism with the interior trim panel removed by a mechanic
There are some internal pieces that move automatically since doors can be locked and unlocked remotely. They consist of rods and links that span the interior of your door. It’s not until you remove the door panel that you’ll be able to see them (spoiler: you’ll be doing this later).
As well as actuators, it uses springs to force the motion. Signals are converted into mechanical outputs when they are received.
The door also has some wires running through it. Their functions include locking and unlocking your door, controlling your window and controlling your side mirrors automatically.
Why Do Car Door Handle Breaks?
Door handles are essential to a door because they make it easy to open and close. Unfortunately, these small but essential parts can sometimes break, which makes the door useless.
The outside door buttons open and close the doors so that people can get in and out of the car. The door is sometimes easy to break. The handles are connected to the outside doors and the device that locks the doors. It makes sure that the doors stay locked. Pulling the handle releases multiple holding rods in the latch mechanism, allowing the door to swing open.
When a door handle breaks, it’s usually because of excessive force, stress, or old age. Metals are used to make door handles, bend, shrink, and grow as the seasons change. So, if you put a lot of force or stress on a door handle, it can break where the metal joins to the door at the hinge.
What Tools Needed To Open a Car Door With a Broken Handle?
To open a car door with a broken handle, you may need the following tools:
Slim Jim
A slim Jim is a thin, flat metal strip with a hooked end for unlocking car doors. It can be put between the door frame and the window to open the door from the inside.
Coat Hanger
As an alternative thin Jim, you can use a straightened wire coat hanger. Turning one end into a hook allows you to reach and turn the door lock.
Wedge
A wedge-shaped object, such as a plastic or rubber door wedge, can create a gap between the car door and the frame. This gap allows easier access for inserting tools and manipulating the lock mechanism.
Long Reach Tool
A long-reach tool is a flexible stick with a hook or grabber on one end. Locksmiths often use these tools. It can help you open the door or lock it outside the car.
Screwdriver
Sometimes, you may need a flat-head or Phillips screwdriver to take off internal panels or get to screws that hold the door handle in place. Replace the handle if it breaks; this is an everyday necessity.
Pliers or Vice Grips
These tools can help grip and pull on rods or cables inside the door to actuate the lock or open the door.
How to Open Car Door with Broken Handle from Outside? Steps Explained!
How to open car door with broken handle from outside? Here are the method you should follow.
Unlock From Remote/Key
Test your key and remote to see if you can get in. Verify that you can open the door using the key or remote. If your key works but the remote doesn’t, it can only be because of a faulty electrical connection.
The auto electrician can fix this. A broken door lock could result from a faulty door handle or a mis-programmed remote control. So, before moving on, you should test this strategy.
Locate and Remove Interior Door Panel
Carefully pull off the inside door panel using a trim removal tool or a flat-head screwdriver coated in a towel. Remove any clips or screws holding it, beginning in one of the bottom corners and working your way around. Avoid damaging or breaking any parts by using excessive force.
Lubrication Of The Lock Mechanism
A jammed locking mechanism can also cause the door handle to shift in its position, making it impossible to unlock the door even with a working key.
You can lubricate the lock when the door doesn’t open from the inside or outside. To begin, choose the preventing keyway. The next step is to release the lock and examine the impasse within. Try opening and closing the door after greasing the lock. Iterate until no more obstacles remain.
Inspect The Locking Mechanism
Most vehicles have plastic coverings inside their doors to prevent water from getting in. To inspect for cracks, remove the inner panels from any plastic. It could be a broken or bent piece. When you remove the panel, you can see what happens when you tighten the door handle. If you cannot open your door from the outside, examine the metal rods inside.
Replace Any Broken Part
Use what you have to see if you can figure this out. Can you get a new one or fix the broken one? It’s not uncommon to find the necessary component at a junkyard. If you don’t have a spare part, consider hiring someone to do the task. A metal cover hanger can do the job when epoxy fails to hold a position.
Ensure the door latch works and everything is straight enough to be unlocked. If you need assistance fixing a door full of electronic components, you should go to a car repair manual and follow its procedures carefully.
Disconnect Electrical Connections
Disconnect the wiring harnesses carefully if your automobile has power windows, locks, or other electrical components built into the door panel. Check for any connectors or clips that need to be released, and do so by pressing the tabs or using pliers.
Remove the Broken Door Handle
The shattered door handle probably has screws or bolts holding it to the door frame. They could be behind the door panel or visible from the outside, depending on the style. You can pry the broken handle off its attachments using a screwdriver.
Install the New Door Handle
Align the new door handle with the holes or places where it will be attached. Use the screws or bolts you took out earlier to hold it in place. Make sure the handle is in the right place and tightened properly.
Reconnect Electrical Connections
Please reconnect all wires to their proper terminals if you have done so. Make sure the connections are tight and the cables are not being compressed or impeded in any way.
Reinstall the Interior Door Panel
Carefully line up the clips or screws on the door frame with the panel. Put light pressure on the pins to snap back into place. If you removed any screws, put them back in and tighten them well. Check again to make sure that all screws and bolts are in place.
How to open car door with broken handle from outside? 5 Additional Tips and Tricks
The first thing to do is to inspect the car door for any damage or other issues that may prevent the handle from functioning properly. The way your car door opens and closes can be affected by cracks in the door frame, dents along its edge, or signs of rust on its handles.
Check inside your car’s bodywork to see if anything is blocking or catching between the handle and its corresponding linkage mechanism if you cannot find any obvious issues with the car door.
Whenever you have a broken handle on your car door, don’t be afraid to try a variety of methods and techniques. You may be able to free the handle from whatever is preventing it from working properly by simply wiggling it in different directions or applying pressure at different angles.
By applying leverage directly on top of the handle mechanism or on top of the edge of the door, you may also be able to pry open the door if you have access to a set of tools.
To make opening your car door easier when the handle is broken, there are several helpful tools you can purchase or DIY. It is common for some people to achieve success using small metal rods or even a screwdriver wrapped in tape at the end.
How To Replace The Exterior Door Handle?
Exterior door handles are more likely to be damaged as they are exposed to dust, debris, moisture, salt, temperature, and sunlight. Continuous use of the door handles leads to stress and fatigue, resulting in failure. When the exterior door handle is exposed to freezing temperatures, it often becomes brittle and cracks when opened. The following steps will guide you through replacing your exterior door handle if you are experiencing these issues:
- You can access the exterior door handle bolts on the door skin from the outside by following these steps:
- You’re more likely to find your car door closed if the exterior handle is broken. If the door is locked, open it from inside the car by entering through another door.
- It may be possible to access the attachment screws from the outside, so you don’t have to remove the interior door panel.
- Painter’s tape can be applied to the area of the door handle that is visible from the outside before unscrewing the bolts.
- Remove the bolts using a ratchet and socket and check if any rods or levers are attached, as they will need to be unclipped.
- Plastic clips are widely used in most vehicles, and they can be easily removed without any tools.
- The handle can finally be freed from the door skin by sliding it forward or backward.
- The new door handle can now be installed, any attachments reinstalled and the door bolted back in place.
- It will be necessary to access the door handle bolts from the inside of the door panel if the bolts are not visible on the door skin. The first step is to remove the interior door panel. In order to do that, follow these steps:
- All the screws holding the panel in place must be removed to remove it. Plastic door trim pieces usually conceal these screws, which can be popped out with a screwdriver’s pry bar.
- Use a screwdriver or ratchet to undo the bolts or screws.
- The interior door handle must be disconnected from the lock mechanism before the panel can be removed.
- An interior handle may be connected to the locking mechanism by two rods and an exterior handle by one rod. In order to remove these, you must unhook the plastic holsters and then lift the rods out of their respective holes. For more information, refer to the service manual
- In many cars, the driver’s door lock cylinder still requires a key. It is possible to swap a working lock cylinder with the new handle so that you can keep your old key if the cylinder is still intact.
- Your car key should be placed inside the old lock cylinder, and the lock cylinder should be carefully removed. Be careful not to break it.
- In the new handle, put the new handle inside the old one.
- The new handle should be inserted by sliding it back on the door skin.
- As you removed the clips or rods, reattach them along with the interior door handle in the same position.
- Install the door panel by tightening the bolts and replacing the clips if the door handle is working properly.
How To Replace The Interior Door Handle?
Because interior door handles are generally made of weaker materials than exterior handles, they are prone to failure. Furthermore, many vehicles are designed in such a way that the handle closes the door. Pulling forces like these can cause the handle to fail prematurely due to excessive stress. It is necessary to remove the interior door trim panel before you can replace the interior door handle.
- All screws holding the panel in place must be removed to remove it. Plastic door trim pieces usually hide these screws, which can be removed using a plastic pry bar or screwdriver.
- Use a screwdriver or ratchet to undo the bolts or screws.
- Prior to removing the panel, unhook the handle from the locking mechanism.
- It is possible for the interior handle to be connected to the locking mechanism by two rods, and for the exterior handle to be connected by one rod. It is necessary to unhook the plastic holsters and then lift the rod out of its appropriate hole in order to remove them
- After removing the panel, lay it aside carefully
- Remove the clips and bolts holding the interior door handle
- Ensure that the replacement interior door handle matches the original
- Assemble the new handle by attaching it to the connecting rods correctly. Afterwards, reinstall the panel after retightening the bolts.
- Reinstall all door trim pieces and tighten all bolts and screws. You should test the door handle to make sure it works.
- It has finally been possible for you to install an operational door handle on your own, thus saving you from a major inconvenience. As a result of doing these repairs yourself, you not only learned how to do them yourself, but also saved a lot of money compared to hiring a professional mechanic.
Should I Repair Or Replace My Door Handle?
It depends on the kind of fracture or fault whether the door handle can be repaired or replaced. The item may be cracked, loose or broken into pieces, or have other visual damages. Typically, car handles are subjected to so much stress and use that repairing them with adhesives or welding is not a good option. In most cases, purchasing a new or used component is more cost-effective in the long run.
Please note that the content in this article is intended only for informational purposes and should not be considered professional advice. Whenever you have any questions or concerns regarding topics covered herein, we strongly recommend consulting a certified mechanic or technician. We will not be responsible for any loss or damage caused by your reliance on any content provided by PartsAvatar Canada.
How To Maintain a Car Door Handle?
Ensuring the smooth operation of locks requires regular maintenance, and one effective method is to maintain their optimal greased state. Utilize a lubricant that is neither excessively corrosive nor overly viscous.
Before inserting the key, introduce a few drops of this lubricating oil into the lock, allowing it to permeate and settle. Similarly, apply a graphite lubricant to the door and trunk locks, guaranteeing proper functioning.
Expanding the application of this spray to include both the front and back door hinges can provide further benefits. Various components can benefit from its versatility as a lubricant.
It boasts compatibility with multiple materials, including porous elements like plastic. This lubricant is a reliable choice for locks, hooks, and even weaponry, enhancing their performance and longevity.
What are The Safety Precautions You Should Maintain?
Safety should be the top priority when opening a car door from the outside with a broken handle. Here are some safety precautions that you should keep in mind:
- Wear gloves and eye protection while opening the car door to prevent potential injuries.
Check the door for any signs of damage or rust before opening it. In cases where the door appears unstable or fragile, seek professional assistance.
Ensure that you have the right tools for the job and that they are in good working order. Make sure you don’t use damaged or worn-out tools.
While trying to open the door, make sure no bystanders are nearby. In case someone is standing nearby, ask them to stand at a safe distance.
Take your time while attempting to open the door. Rushing the process can lead to injuries or damage to the car. - By following these safety precautions, you can minimize the risks of opening a broken car door from the outside.
How Much Is The Cost Of Replacing a Broken Car Door Handle?
If you face a troublesome door handle, you can address it independently. However, if you lack the essential tools, spare time, or motivation to undertake such a task, it would be prudent to entrust the expertise of a qualified technician. They possess the necessary skills and equipment to tackle the issue of your car effectively.
Well, now the question is, Should you decide to pursue professional assistance, having a general idea of the potential costs is helpful? On average, the price range for replacing an inside handle at a reputable shop typically falls between $50 and $200. This estimate encompasses the labor and materials required to complete the task satisfactorily. Considering these factors, you can decide on the best course of action for resolving the door handle predicament.
Final Thought
Now you have a good idea of how to open car door with broken handle from outside. We’ve discussed several ways to open a car door with a broken handle from the outside. You can use the car door handle to open the car door even if the handle isn’t working anymore.
Hopefully, you’ve read it all to get ideas, solutions, etc. It is advisable to handle the door handles gently and ensures regular lubrication of the locking system. You can minimize the strain and potential wear on the mechanism by employing a gentle touch when operating the handles.
In addition, maintaining an adequately lubricated locking system helps reduce the burden on its components, promoting smoother operation and longevity.
FAQs
Can you repair a broken door handle?
New car door handles can make your car look better, repair broken factory handles, and make it easier for people with mobility issues to get in and out of the vehicle.
What is the finest adhesive to fix a car door handle?
Since Rhino’s Ultra Glue Gel is impervious to water, vibration, shock, and heat, it will permanently fix your car’s damaged fender, door handle, or rearview mirror.
What’s wrong with my car door handle?
The wire or metal rod isn’t working if your door handle needs fixing. It could cause the handle to get stuck in the open position. But sometimes your door handle won’t work because some of the nuts that hold it together are loose.
Is fixing a door handle easy?
Most door handles are easy to take off. Most door handles are attached to the door with screws, but some with grub screws. Some will have fixings that aren’t visible under the rose plate on the outside. Some may have two places to screw in, so you can do it from both sides.
How pricey are automobile door knobs?
Replacing a broken handle can cost anywhere from $80 to $500, but the exact amount will depend on the type of handle that broke.
Modern cars have an “Engine Off Power Delay” feature, which leaves some electrical parts running for about 10 minutes after the engine shuts off.
After the ignition is turned off, things like the headlights, internal lights, infotainment systems, and power windows work for a few minutes. The goal is to make getting out of the car more accessible and safer, especially at night.
It ensures enough light for people to leave their cars safely and reach their goals. It also lets electronic gadgets plugged into the car’s power source be used or charged quickly without draining the battery too much.
The power delay time is carefully managed so that the battery doesn’t drain too quickly but still has enough time for essential tasks. Power to these components is automatically shut off to conserve the vehicle’s battery once a set delay time has elapsed or when the driver opens a door.
Overall, Engine Off Power Delay is a valuable feature that improves ease and safety by keeping some electrical systems running even after the engine turns off. Keep reading if you’re interested in finding out more.
Engine Off Options
On the touchscreen, if you press Engine Off Options, the following settings will appear
Easy Entry/Exit Seat – If Equipped
Using this feature, the driver’s seat can be automatically positioned to enhance mobility while entering and exiting the vehicle. Select the “Easy Exit Seat” setting by pressing the “Easy Exit Seat” button on the touchscreen, until a checkmark appears beside it.
Engine Off Power Delay
Upon activation of this feature, power window switches, radio, Uconnect phone system (if equipped), DVD video system (if equipped), power sunroof (if equipped), and power outlets will remain active for up to 10 minutes after the ignition has been turned off. You can cancel this feature by opening either of the front doors. The Engine Off Power Delay status can be changed by pressing the “+” or “-” button. The options are “0 seconds,” “45 seconds,” “5 minutes,” and “10 minutes.”
Headlight Off Delay
The driver can select this feature so that the headlights remain on as they exit the vehicle for 0, 30, 60, or 90 seconds. On the touchscreen, press the + or – button to select the desired time interval for the Headlight Off Delay.
What Is Engine Off Power Delay?
After the engine is turned off, some vehicles have an Engine Off Power Delay feature that keeps the radio and other electrical components powered for a short period of time.
If you don’t want to run the engine while listening to music or using other vehicle features, this can be helpful.
After the engine has been turned off, the system detects and activates a timer that delays the power-off signal for a set period of time.
As a result of this delay, the radio and other components will continue to receive power from the battery, so they can continue to function normally.
How Engine Off Power Delay Works?
When the Engine Off Power Delay feature turns on, some of the car’s electrical parts will keep working for a while after the engine shuts off. These parts include the switches for the power windows, the radio, the Uconnect phone system (if it’s installed), the DVD video system (if it’s installed), the power sunroof (if it’s installed), and the power plugs.
After the ignition turns off, the Engine Off Power Delay function powers these components for 10 minutes. It’s worth noting that if you open a front door, the feature will be off immediately to prevent unnecessary power consumption.
The length of the Engine Off Power Delay can be changed if someone wants to make it fit their needs better. To do this, go to the settings menu and use the “+” and “-” buttons to move through the choices. Users can choose from “0 seconds,” “45 seconds,” “5 minutes,” or “10 minutes.” A longer delay time extends functioning when the engine is shut off, whereas a lower delay time conserves battery life.
Pros & Cons Of Engine Off Power Delay
The benefits and drawbacks of engine off-power delay are numerous. We’ll look into them and decide what fits them well.
Pros Of Engine Off Power Delay
Convenience
Engine Off Power Delay lets passengers use power windows, radios, and infotainment systems after turning off the engine. It’s a great time saver, especially when waiting in the car or running errands.
Safety
When leaving a car at night, the power delay function ensures the lights inside and out are bright enough for the occupants to see. It improves security by facilitating sight in low-light conditions, decreasing the likelihood of trips and falls.
Battery Preservation
The power delay technology was meticulously created to balance practicality and battery life extension. The battery life is prolonged, and unnecessary wear and tear are avoided by cutting power off to specific components after a set amount of time or when a door is opened.
Device Charging
Even when the engine is off, Engine Off Power Delay enables passengers to charge their phones and tablets. This function is helpful during brief stops or waiting periods in the car, keeping electronics operational.
Cons Of Engine Off Power Delay
Limited Timeframe
Depending on the car and preferences, the power delay can be anywhere from a few to 10 minutes. There may need to be more for some tasks or situations where electrical components must be used for a long time.
Battery Drainage
Even though the power delay function saves battery life, using electrical parts for a long time can still drain the battery. It’s essential to use the power delay feature carefully and only depend on it a little for long periods without running the engine.
Customization Limitations
Some cars allow you to change how long the power delay lasts, but others may have settings that can’t be changed. This lack of ways to change things may not meet the preferences or wants of each person.
System Dependencies
The power delay feature may or may not be available, depending on how the car is set up and what options are added. Not all cars have this feature, especially older ones or those with the most basic trims. It means that its benefits are only available on some car types.
Is There Any Advancement In Power Delay Technology?
Some advancements aim to enhance the functionality, efficiency, and customization options of the Engine Off Power Delay feature. Some significant progresses include:
Adjustable Delay Duration
Modern vehicles often allow users to adjust the duration of the power delay according to their preferences. Instead of having fixed time intervals, users can select a specific delay duration that suits their needs. This customization option provides greater flexibility and allows for a more tailored experience.
Smart Sensor Integration
Advanced power delay systems can utilize intelligent sensors to detect occupant presence and adjust the delay duration accordingly. For example, the power delay may be extended automatically if occupants remain inside the vehicle. On the other hand, if all occupants exit the vehicle, the power delay may be shortened or deactivated to conserve battery power.
Enhanced Energy Management
With the focus on efficient energy utilization, power delay technology has become more intelligent in managing power distribution. It can prioritize critical systems, such as lighting and safety features while reducing power to less essential components. This optimization helps prolong battery life and ensures that vital functions remain operational.
Integration with Vehicle Connectivity
As vehicles become increasingly connected, power delay systems can be integrated with vehicle connectivity platforms. This integration allows users to remotely control and customize the power delay settings through smartphone apps or vehicle infotainment systems. It provides a seamless and user-friendly experience for managing power delay preferences.
Integration with Start-Stop Systems
Start-stop systems, which automatically shut off the engine when the vehicle is stationary, can be integrated with power delay technology. This integration ensures a seamless transition between engine shutdown and power delay activation. It allows the power delay feature to engage as soon as the engine turns off, providing uninterrupted functionality to occupants.
Integration with Hybrid and Electric Vehicles
Power delay technology is also evolving to accommodate the unique characteristics of hybrid and electric vehicles. These developments provide electric vehicles with unique power management needs, enhancing power delay features for maximum efficiency and battery life.
Final Thought
The Engine Off Power Delay feature improves the driving experience by maintaining electrical system functionality while conserving battery power.
When enabled, the Engine Off Power Delay feature ensures that specific electrical components in the vehicle remain operational for up to 10 minutes after the ignition turns off.
It’s worth noting that activating this function requires closing both front doors.
Also, the power delay system strikes a good balance between usefulness and battery life. It prevents the battery from being drained to zero by turning off some components after a set delay or when a door is opened.
FAQs
Can the power delay feature be turned off?
In most cases, the power delay feature is a default setting that cannot be fully disabled. However, adjusting the duration to the shortest available option (e.g., “0 seconds”) effectively deactivates the feature, as the power to the components will be cut off immediately when the engine is turned off.
Does the power delay feature drain the vehicle’s battery?
The power delay features balance functionality with battery preservation. While it can consume some power during the delay period, it is typically programmed to automatically cut off power to the components after the specified duration to prevent excessive battery drainage.
Which electrical components remain active during the power delay?
The specific components that remain active can vary between vehicles, but common examples include power window switches, radios, infotainment systems, power outlets, and interior lighting. The availability of certain features may depend on the vehicle’s configuration.
What happens if I open the front door during the power delay?
Opening the either front door during the power delay period will automatically cancel the feature. The purpose of this is to conserve battery power when the vehicle is not in use.
The company’s full name was Svenska Aeroplan Aktiebolaget, also known as Saab. Saab a Swedish luxury car brand known for its sleek design and innovative technology. However, even the most advanced vehicles can encounter a common problem – losing your key. So how to start a Saab without the key?
The first step is to check if your model has a physical ignition switch or a push-button ignition system. The best thing you can do is not lose the key (key fob) because the car won’t start without it. This is because the key has a chip that does the recognizing. Important information regarding Saab vehicles’ immobilizer keys and remote controllers includes always keeping an extra key on hand.
Even though a Saab key is minor, the cost of a new one can be very high. Only spend some of your monthly money on a car key just because you need one. HMS Locksmith can save you up to 80% off the price of a key fob for your Saab at the store.
Read further to learn about how to start a Saab without the key?
What are the Different Types of Saab Car Keys?
Car keys are becoming more sophisticated as cars become more sophisticated. In addition to making car keys more convenient to use, they also became more secure, making it harder for thieves to steal cars.
Ordinary key
In older cars, traditional keys are similar to padlock keys, door keys, and are used for padlocks. They fit perfectly into the car door, boot lid, and fuel tank cap because of their special, unique design.
It is easy for any locksmith to copy the traditional key, therefore, it offers the least amount of security.
Remote controlled ordinary key
The built-in remote control on this type of key allows you to lock and unlock the door from a distance. An alarm system is also attached to the key, which helps to locate the vehicle in a crowded parking lot and deter thieves from stealing it.
Chip key
The key contains a radio frequency chip that transmits a signal to the car’s receiver. Immobilizers prevent the car from starting unless the correct signal is sent to the receiver.
Smart key
The advantage of keyless starting is available with cars that feature smart keys. A proximity sensor in the receiver in the car unlocks the door automatically when the key is brought near it, and the ignition is turned on by pressing a button.
With the smart key, you can program a variety of options. As well as switching on and off things like air conditioning and stereo systems, they can also adjust the temperature.
Digital Key
An app controls the door locks, ignition, and other features of cars equipped with a digital key. The mobile phone is used to control all the car’s features, making it the most secure type of key.
What is an Immobilizer in Saab Car?
Saab cars are renowned for their advanced security features, and one such feature that plays a vital role in preventing theft is the immobilizer system. It provides security beyond traditional keys and keyless entry systems by acting as a robust anti-theft measure.
Immobilizing the engine is a powerful deterrent to unauthorized individuals attempting to start and operate the vehicle. This advanced system employs transponder technology, utilizing a unique electronic chip embedded in the key.
How does Immobilizer work?
The immobilizer device reads the identification code from the transponder when the key is put into the ignition. The car’s immobilizer control unit (ICU) checks the code against a database of known good entries. If the codes are compatible, a signal is sent to the ECU (engine control unit) to begin the ignition process.
Saab’s immobilizer technology improves safety by avoiding theft techniques, including hot-wiring and ignition bypass.
It fits in perfectly with the rest of the car’s electronics. It’s not easy to disable or get around it, so it deters would-be burglars. Proper key programming and maintenance are crucial for optimal performance.
If problems arise, contact a professional mechanic or a Saab dealership for official help. The immobilizer system adds another layer of safety to Saab automobiles, giving their owners more peace of mind and safeguarding their investments.
What’s The Key Mechanism In The Older Version Of Saab Cars?
The good news (or bad news) for those who own Saab vehicles made before 1994 is that they do not employ an alarm system as an immobilizer based on a coded key. The older version’s key mechanisms have both upsides and downsides.
The upside is that spare replacement keys are easier to obtain; the downside is that this may make car theft more likely.
While some Saab 900 and 9000 vehicles came equipped with an anti-theft system named “Saab Guard,” it was an early, relatively “primitive” device that did not use a remote. Vehicles manufactured by Saab since 1995 have included an immobilizer alarm system and a keyless ignition remote control. This add-on was about the car using the Tech2 diagnostic tool. The classic key doesn’t have any protection features.
What Kind Of Key Used In Saab 9-3/2003-2011 Model?
However, the Saab 9-3 is by far the most popular and widely available Saab vehicle.
The model’s keys are our next topic of discussion. More cutting-edge technologies were added to the security system only with the 2003 debut of the Saab 9-3.
Unlike all primary keys, the new key fob did not require a typical metal key to access the vehicle or start the engine.
Convertible models now feature “Hello” lights and panic alarms that can be activated remotely by opening the windows or the roof. This feature depends on the model and level of equipment.
Most drivers of these Saabs have two key fobs; they are programmed using a specialized Tech2 device, and both must work appropriately for the vehicle to start.
How To Start a Saab Without The Key?
Losing both keys or encountering a situation where the car’s ignition switch can recognize neither key presents a significant challenge for Saab 3-9 owners. So how to start a Saab without the key?
In such cases, the only solution is to replace the CIM (Column Integration Module) module and acquire two new Genuine Saab keys.
This scenario emphasizes the critical role of the keys in the Saab 3-9 model, as they are essential for proper communication between the ignition switch and the car’s systems.
When faced with a complete critical loss or a failure to read the keys, replacing the CIM module and obtaining new keys becomes necessary to regain access and functionality. Reaching out to authorized Saab service providers or dealerships is crucial to facilitate this critical replacement process. It ensures compatibility and optimal performance for the Saab 3-9 model.
Other methods may include:
1.Screwdriver and hammer / drill
One of the easiest ways to start a car without a key is to use this technique. The ignition switch, however, must not be damaged during this process.
In this case, the ignition switch will be permanently disabled if you use a screwdriver and hammer to damage the lock pins.
You will need to drill almost two-thirds of an inch into the inner flaps of the ignition switch if you are using a drill.
The drill can now be removed, and a screwdriver can be inserted into the drilled hole. Now you can try to start the car.
It is even possible to start the car without a screwdriver by using a flat piece of metal. A screwdriver and hammer are excellent substitutes for a drill if you do not have one or do not want to use one. It only takes a gentle hammering to get the screwdriver through the ignition switch.
The locking pins of the ignition switch will, however, be damaged by this method. Check out these simple tricks and devices to prevent car theft.
2. Hot wiring the ignition
Older vehicles benefit from this method, called hotwiring. Bypassing the battery and ignition switch is the main feature of hotwiring.
It is first necessary to remove the plastic covering on the steering column. It typically has two small screws that you must undo in order to access the wiring terminals.
This method involves directly handling live wires, so you should wear protective gloves or insulating gloves. Batteries have red wires, which are most commonly found. In most cases, the ignition wires are brown and yellow in color.
The battery wires should be slit in the insulation. Follow the same procedure for the ignition wires. Battery wires should be connected to ignition power wires by twisting them together. The car should start as soon as you connect it.
3. Red Coil wire method
It will work for you if you believe that you possess the skills of a professional and have the knowledge of a mechanic.
Look for the red coil wire under the hood of your car. The positive terminal of the battery should be connected to the red coil wire with a jumper starter cable. It is actually the positive terminal of the ignition coil that is red.
Under the steering wheel, locate the starter solenoid by opening the plastic cover. After the battery positive terminal has been connected to the starter solenoid, the starter should be turned on. A screwdriver can be used to connect the positive terminal of the solenoid to the ignition switch wire.
From now on, you can directly connect the battery to the ignition switch. Easy starting is possible.
Situations When You May Need To Start A Car Without The Key
There may be times when starting the car without a key is necessary. This process is usually made more difficult by car manufacturers due to security concerns. Your car is just too valuable to be robbed by a thief.
One can, however, start the car without a key by using a variety of methods. Several situations can be found here:
1.The car key is lost
It is most common for a vehicle owner to try to start a car without the key when the key has been lost or misplaced. When you are away from home and do not have a spare key, it can be very inconvenient to lose your key. It is possible to use the methods listed above in this situation.
2. Faulty ignition switch
The ignition switch is the place where the majority of the electronics and wiring in the car are located. In order to start the engine, the ignition switch is activated and power flows from the battery to the starter motor.
ECU and ignition coil are also powered by the ignition switch. It is possible to start your car by hot wiring or by using the red coil wire method if the ignition switch is broken.
How Does The CIM and Key Fob Work In Saab Cars?
To unlock the steering column, turn the key in the ignition. It will activate the Column Integration Module (CIM). After passing the LOCK, the key can be turned OFF, ON, and ST. When in the LOCK position, the key is physically prevented from being removed.
While you’re at it, know that as soon as you insert your key, your ignition switch module (ISM) kicks into gear by constantly sending updates about its position to the CIM. That information gets passed along to both P-bus and I-bus systems.
Ultimately, the engine control module (ECM) gets activated when you turn your key to the ST position; at that point, it takes over responsibility for starting your vehicle by activating its starter motor.
Ignition Switch Model Tasks and Key Mechanism In Saab Cars
The ignition switch in Saab vehicles, known as the ISM (Ignition Switch Module), plays a crucial role in the overall functioning of the vehicle’s key mechanism and security systems. To ensure seamless operation, it works with other components, such as the CIM (Column Integration Module) and the SCL (Steering Column Lock).
Here’s an overview of the unique uses and functions of the ignition switch:
Transponder Code Communication
The ignition switch communicates the transponder code, unique to each key, to the CIM through a communication cable. It allows the CIM to identify and authenticate the key for starting the vehicle.
Key Position Communication
The ignition switch also sends information about the key position to the CIM through the communication cable. This information is then forwarded to the relevant buses within the vehicle’s systems, ensuring proper coordination and control.
Battery Status Monitoring
Through the communication cable, the ignition switch sends the status of the remote control battery to the CIM. It enables the CIM to display a battery warning on the SID (Saab Information Display) if the battery needs attention or replacement.
Security Measures
The ignition switch prevents the key from turning from LOCK to OFF until the SCL is unlocked and the transponder code has been approved. Similarly, it prevents the key from turning OFF to LOCK until the vehicle has stopped and the gear selector lever has been shifted to the P (Park) position.
Steering Column Lock Operation
Before locking the steering column, the ignition switch releases the SCL locking pin via a direct lead. This command is received from the CIM through the communication cable. Additionally, the ignition switch receives information from the SCL through a direct lead, confirming the unlocked and released position of the locking pin, which is then communicated back to the CIM.
Illumination of Key Positions
The ignition switch is responsible for illuminating the key positions and providing visual feedback to the driver about the current state of the ignition.
Power Distribution
Direct leads run from the ignition switch to various units within the vehicle in certain key positions. It ensures that the necessary components receive the required power for proper operation.
Saab Car Key Replacement Services
When was the last time you wondered “How can I get a replacement car key? ” Probably, rarely or only when you need this key. Knowing what to do in case of a Saab key replacement won’t hurt, since you never know when you might need one. Getting a new key can be done in two ways, each with its own advantages, disadvantages, and features, so you can select the one that works best for you.
The first thing you can do is go to your local car dealership. Getting a spare key this way is sure, but not very convenient if you need assistance immediately. The cost of this method is also higher. In contrast, the second solution is more of a one-size-fits-all approach. Whenever you call a locksmith, you can expect immediate assistance. With the help of mobile service vans, a car key locksmith will arrive quickly so that the key can be provided to you as soon as possible.
Whether you need a Saab key fob replacement or a Saab battery replacement, a skilled technician will handle the job quickly. Additionally, you will save a lot of time and money by choosing this method.
How To Get A Car Key Replacement?
Provide the following information to Sure Lock & Key, car key replacement service assistants:
- Your car’s model, year, and make
- Address and zip code of your exact location
- Your car’s VIN number
- A transponder key or a key fob will suffice.
- Provide proof of car ownership when requested
How Much Is The Replacement Cost Of Saab Key?
Saab vehicle uses a more advanced key fob or transponder key; the cost may be higher due to the need for programming or synchronization with the vehicle’s immobilizer system. A basic Saab key replacement typically ranges from $100 to $300.
Only spend some of your monthly money on a car key just because you require one. HMS Locksmith can save you up to 80% off the price of a key fob for your Saab at the store.
Final Thought
Now you might get an idea of how to start a Saab without the key. Attempting to start a Saab car without a key can be complex and challenging. Saab vehicles have advanced security systems, including immobilizers and coded keys, to prevent unauthorized access and theft.
These security measures make it extremely difficult to start a Saab car without a key. It is strongly advised not to engage in any unauthorized attempts to start the vehicle without a key, which may lead to damage or malfunctions.
Suppose you find yourself in a situation where you have lost or misplaced your key. In that case, the best action is to contact a professional automotive locksmith or authorized Saab dealership. That is how to start a Saab without the key.
FAQs
Does Saab require a key fob to start?
Don’t lose the key (key-fob), because the car won’t start without it. This is because the key has a chip that does the recognizing. Important information regarding immobilizer keys and remote controllers for Saab vehicles includes: Keep an extra key on hand at all times.
Why won’t my Saab key turn?
A Saab 9-5 key usually won’t turn because the steering column or lock is stuck, the ignition switch is broken, or the ignition key is broken. Look through our list of RepairPal Certified shops to find one near you where you can talk to a technician about your problem.
How do you start a Saab?
The key goes into the ISM, which stands for “Ignition Switch Module.” The CIM, which stands for “Column Integration Module,” is inside the steering wheel.
Can you change the Saab key?
Even though a Saab key is minor, getting a new one can be very expensive. Don’t spend all your monthly money on a car key just because you need one. HMS Locksmith can save you up to 80% off the price of a key fob for your Saab that is programmed at the store.
Why are the keys for a Saab in the middle?
It also had a rounded windshield like Saab’s fighter planes, and the key portal was on the center desk so the key wouldn’t fly at you in an accident.

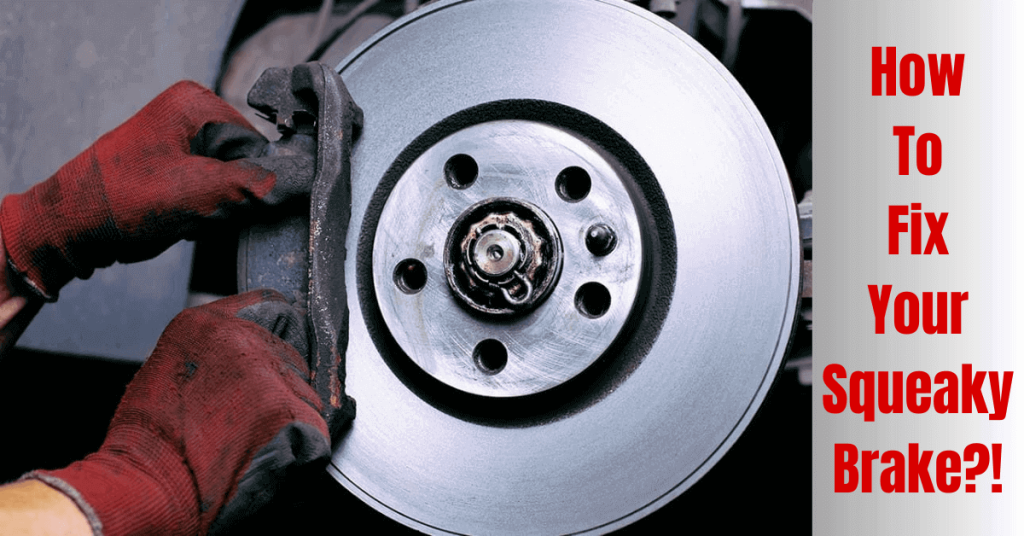
In most cases, worn brake pads are the first thing that comes to mind when you hear a squeaking or screaming sound emanating from your brakes. The reality is that there could be many issues. Your brake system is causing that annoying, high-pitched noise. Then you might have question, why do my brake squeak?
It is common for brake pads to squeak or squeal when they are worn. But it can also happen for various other issues with the brake system. Rust on rotors after rain, new pads adjusting to rotors, or a faulty caliper can all result in temporary high-pitched noise.
If the noise stops after a few brake applications, there is likely no issue. However, if the squealing persists, or you experience decreased braking power. To determine the cause of your brake squeal, read on to learn about potential problems with your brake system.
Why Do My Brake Squeak? Reasons!
The most common causes of brake squealing are:
- Worn brake pads.
- Glazed brake pads
- Dirty or contaminated brake pads
- Worn or damaged brake rotors
- Misaligned brake calipers
- Your particular braking technique
- Lack of lubrication on drum brakes
- Brake hardware that is loose or worn
- Metallic brake pads
- Overnight humidity
If the noise persists for over a day, it’s time to get your car checked out by a trusted mechanic. Ignoring this simple yet persistent squeaking could snowball into a significantly more expensive brake repair.
You don’t want that headache, right?! But here’s another thing to remember: if that annoying squeak suddenly transforms into an unsettling grinding noise or worse, if you feel like your braking power has taken a nosedive, we’ve got ourselves a problematic situation. It could be a potential brake failure.
So remember, never underestimate those seemingly harmless sounds; they might just be trying to tell you something important about your car’s well-being.
Let’s explain the reasons to make you understand better.
Worn brake pads
In cars, worn brake pads are a typical problem. The friction substance on the brake pads deteriorates over time.
Which affects how well the car can stop. This may result in greater braking force, increased stopping distances, and wear on other brake parts. To preserve the safety of the vehicle and its occupants. It is critical to replace worn brake pads as soon as possible.
Glazed brake pads
Heavy braking, fast speeds, or extended use might result in glazed brake pads. These elements may lead to an overheating of the brake pad. Which may result in friction material hardening and losing its efficiency.
When the brakes use, this may lead to decreased stopping power, a longer stopping distance, and a squeaking or grinding sound.
To ensure optimal braking performance and safety. Having glazed brake pads evaluated and replaced as soon as possible is crucial. Regular brake inspections can also show whether the brake pads need to change because they have gotten glazed.
Dirty or contaminated brake pads
The performance of the brakes might also affect by dirty or infected brake pads when brake pads become tainted with dirt, dust, oil, or other things. The effectiveness of the friction material reduces, and braking performance changes.
A squeaking or grinding sound when you use the brake is another contamination symptom. It is crucial to keep the brake pads clean and to inspect them for contaminants routinely.
Worn or damaged brake rotors
Braking performance problems can happen due to worn or broken brake rotors. The brake pads clamp down on the braking rotor, which is a disc to stop the car. When the brake rotor gets worn out or broken, it can lessen the efficiency of the brake pads.
This can lead to decreased stopping power. n increase in stopping distance, and a squeaking or grinding sound when applying the brakes. Numerous things, including extreme heat, hard braking, and poor maintenance, can lead to worn or broken brake rotors.
Misaligned brake calipers
The performance of the brakes might be affected by misaligned brake calipers. The caliper may become out of alignment. This can lead to unequal pressure on the rotor, lessening the efficiency of the brake pads. Decreasing braking performance, extending stopping distance, and making a squeaking or grinding noise when applying the brakes.
Poor construction, careless maintenance, worn-out or damaged suspension components, and misaligned brake calipers are a few causes.
Your particular braking technique
Your brake pads’ surface may develop a hard, smooth glaze due to frequent, harsh braking, especially at high speeds. Glazing can also happen when applying the brakes downward. The brake system’s shims, pins, or bushings. When applying the brakes, other braking components, worn or loose, may also make a squeaking sound. Because the standard brake pads are not designed to handle the temperature increase brought on by constant friction.
Glazed brake pads no longer generate the friction needed to bring a vehicle to a stop. They might also crumble or crack. Therefore, you’ll need to have them changed. It’s also critical to keep in mind that a brake caliper issue, such as a hydraulic one, could result in the brake pads rubbing against the rotor even when the brake pedal is not depressed. If these parts become worn out or damaged, the brake pads and rotor won’t stay aligned properly.
Lack of lubrication on drum brakes
Without lubrication, drum brakes may squeak when you apply them because the brake shoes scrape against the backing plate. Additionally, this might cause the brakes’ drum and shoe wear to increase, resulting in less effective braking. The drum brakes will be well lubricated, and you can prevent this issue by greasing the backing plate where the piston meets the shoes with brake grease.
Squealing brakes can also be caused by brake hardware that is worn out or loose. Braking hardware, such as the shims, pins, or bushings can make a squeaking sound if you apply the brakes. The brake pads and rotor won’t stay in the right alignment if these components are damaged or worn out.
Brake hardware that is loose or worn
When you apply the brakes, worn-out or loosened shims, pins, or bushings in the brake system may make noise. These parts keep the brake pads and rotor aligned, so if they start to wear out or become loose, the brakes might not function as well.
The brake pads will also vibrate and squeak as a result of this. to confirm the effectiveness and alignment of the braking system. If you find the brake hardware is worn out or broken, inspect and replace it. Regular brake inspections can help determine whether the braking system needs replacement or not.
Metallic brake pads
The kind of brake pad material may also affect how often your brakes squeak. The rotor rubs against the brake pads when using semi-metallic brake pads. Which contain significant amounts of copper, iron, steel, graphite, and other metallic materials may squeak.
The noise might stop once the pad has worn past that specific area or layer. Organic brake pads are the least expensive option, but they don’t last as long and create a lot of dust. The most expensive option, ceramic brake pads provide the best quality, and performance, and are the quietest of all sorts. They also have longer lifespans. Ceramic brakes might be a good choice if the squeaking annoys you.
Overnight humidity
The application of brakes may also be noisy due to overnight moisture. If there is water on the brake pads or rotors, the brakes might squeak when you apply them. Because the water forms a barrier between the brake pads and the rotor, this occurs.
It is more difficult to stop the car due to the decreased friction of the barrier. Rainy seasons or humid climates are particularly prone to this problem. To fix the issue, you can either use compressed air or let the brakes run for a few minutes to dry them out. If parked overnight in a humid area, it instructs us to cover the car or keep it in a garage.
How Do I Fix My Squeaky Brakes?
From a small amount of moisture that accumulated overnight to a severe issue with your brake caliper or hydraulics, there are many reasons why my brakes squeak.
There are a variety of solutions for brake squeaking, ranging from temporary fixes to complete replacements.
It may be as simple as greasing the contact points if your newly purchased or installed brakes still make noise. The brake pads in the caliper must be removed first.
Then, lubricate the caliper carrier and other moving parts, such as the rear of the pads and the contact points. Grease can interfere with the performance of the rotors and the pads, so be careful not to get any on them.
When brake pads aren’t correctly installed, the vehicle may vibrate. Shims can be installed to dampen vibrations and solve the problem, ending the squeaking. They’re often made from rubber, decreasing vibrations while ensuring brake pads are securely linked to brake calipers.
The squealing could be due to the cheap brake pads you installed the last time. If you want more effective stopping power and quieter operation, your mechanic may suggest upgrading to more expensive metallic pads.
But after a certain number of miles of constant use, your brake pads and rotors will begin to squeal and need to be replaced. A harsh metal-on-metal grinding noise may be heard at that point if you try to halt.
It may be more evident that your brake pads or rotors require replacing than it would be to diagnose any other potential causes. It’s time for brake work if the stopping capacity of the brake pads is less than three-eighths of an inch or if the rotors have prominent grooves or noticeably raised lips.
Watch Here
Conclusion
It’s also good to perform frequent brake inspections for routine vehicle maintenance. Then you can identify potential problems before they become more severe and ensure your brakes are always in good working order.
Changing brake pads and rotors before they are too worn is also essential due to the possibility of reduced stopping power and increased wear on other brake components. Overall, recognizing the warning signs that your brakes may need maintenance is essential.
Keep Reading Why Does My Car Heater Take Ages To Warm Up? Reason Explained!
FAQ’s
Why do my brakes screech when it rains?
After a rain, brakes may screech since rotor rust might develop due to moisture. When the brake pads grab the rust, it produces a high-pitched noise.
Are squeaky brakes safe to use while driving?
If the squeaking is coming from worn brake pads. Driving is unsafe because doing so could make your braking less effective. Increase the distance you stop at as well.
Can I fix squeaking brakes myself?
In some cases, such as those with contaminated rotors or improperly installed brake pads, you may be able to clean or adjust the brake components to resolve the squeaking.
How much does it cost to fix squeaking brakes?
The cost of fixing squeaking brakes will depend on the cause of the squeaking and the type of repair needed. It could range from a simple brake pad replacement to a more complex repair, such as replacing the calipers.
How long do brakes last?
The lifespan of brakes will vary depending on factors such as driving style, road conditions, and vehicle usage. On average, brake pads can last anywhere from 25,000 to 70,000 miles.